Showing posts with label Chiffon. Show all posts

Friday, 22 January 2016

matcha yoghurt chiffon cupcakes


These matcha yoghurt chiffon cupcakes are put together with leftover egg whites from making some hollandaise sauce; the ever available low fat plain yoghurt in the fridge, plus a new can of matcha green tea powder.


After having tried the Plaster Blaster prata (prata served with ham, poached eggs and hollandaise sauce) at the Springleaf prata place, my elder son has been pestering me to try our hands at making our own hollandaise sauce. He even picked up this cookbook 'Ratio: The Simple Codes Behind the Craft of Everyday Cooking by Michael Ruhlman' which I borrowed from the library to learn how to prepare the sauce. This is probably the very first cookbook he has read. I suspect the title must have caught his eyes when I left the book on the coffee table. You see, he likes or rather love mathematics, and of course he enjoys good food...it doesn't have to be an expensive gourmet dish as long as it tastes good or suits his delicate palate. I won't elaborate on our hollandaise sauce experiment here but he did manage to pull together his own version of plaster blaster prata with frozen pre-made prata, his newly acquired skill on poaching eggs with cling wraps, and the resulting not too bad (but still lacking something?) hollandaise sauce.

Saturday, 13 June 2015

oil-free chocolate chiffon cake

怎么可能?!
无添加奶油 &油还是一样好吃?!


This is the subtitle of a cookbook, which means, 'How could that be possible?! It still tastes as good without adding butter or oil?!'


When my baking friend showed me her oil free chocolate banana muffins made following a recipe from this cookbook, 好吃不发胖低卡甜点 (loosely translated as: delicious low-calories desserts), I got really interested.

Monday, 7 April 2014

kinako chiffon


This is a much delayed post. I have made this Kinako Chiffon cake on several occasions but only managed to take pictures of it when I baked one again recently.


Kinako is roasted whole soy flour commonly used in making Wagashi (traditional Japanese confectionery) such as dango and mochi. I find kinako tastes bland on its own, but it has got a very nice nutty fragrance, somewhat like roasted peanut powder, or similar to the familiar whiff of an open jar of peanut butter. It is a healthy, gluten-free wheat flour with a high nutritional value, full of vitamin B and protein. It is easy to incorporate kinako into one's diet...sprinkle some over buttered toast bread with sugar or honey; dust it over ice cream, yoghurt or mixed it with soy milk or cow's milk for a nutritious beverage. Kinako also works well in baking recipes such as pancakes, cookies and quick breads.


Although the recipe from the cook book 'Okashi – Sweet treats made with love by Keiko Ishida' states 'brown sugar' I used dark brown sugar. As a result my chiffon cake has a much darker shade. Dark brown sugar has more molasses, this gives the cake a deeper, richer flavour. The texture of the cake is light and airy and has a nice 'peanut butter' fragrant.


I served the cake with banana slices sprinkled with kinako powder and a drizzle of homemade dark brown sugar syrup. I got the idea from this famous Chinese blogger, Carol, when I stumbled upon her post 黑糖蜜黃豆粉香蕉 (banana with dark brown sugar syrup and kinako). It only takes a little extra effort to turn the cake into a delightful sweet treat that my family enjoys :)


Kinako Chiffon Cake (黃豆粉戚风蛋糕)

Ingredients:
(makes one 7" cake)

3 egg yolks (use large eggs)
15g dark brown sugar
40g vegetable oil (I used canola oil)
40g water
30g cake flour
30g kinako (roasted soybean flour)

3 egg whites (use large eggs)
30g caster sugar
6g corn flour


Method:
  1. Place egg yolks in a mixing bowl. With a balloon whisk, whisk the yolks a little. Add in brown sugar and whisk to combine. Add in vegetable oil gradually, whisk to combine. Add the water, whisk to combine. Sieve over the flour and kinako, whisk till the flour is fully incorporated. Do not over mix. Set aside.
  2. Mix the 30g caster sugar with the corn flour.
  3. In a clean, dry mixing bowl, beat egg whites with an electric mixer on low speed until mixture becomes frothy and foamy. Add half of the sugar and corn flour mixture and turn to high speed and beat the mixture. Continue to add in the remaining sugar mixture and beat until the egg whites reaches the soft peak stage.The soft peak stage is reached when the peaks of the whites curl over and droop slightly. The egg whites should appear smooth and glossy. (Do not over beat the whites still stiff, it is better to beat the whites still soft peaks for easy folding with the yolk batter.)
  4. Add the beaten egg whites into the egg yolk batter in 3 separate additions, each time folding gently with a spatula (I use a balloon whisk) until just blended.
  5. Pour batter into a 7" chiffon tube pan(do not grease the pan). Tap the pan lightly on a table top to get rid of any trapped air bubbles in the batter.
  6. Bake in pre-heated oven at 180 degC for 30 mins, or until a toothpick inserted into the centre comes out clean, when lightly pressed the cake will spring back. Invert the pan immediately and let cool completely before unmould. To remove the cake from the pan, run a thin-bladed knife around the inside of the pan and the center core. Release the cake and run the knife along the base of the pan to remove the cake.
Serving suggestions: Serve chiffon cake with sliced banana, topped with 1 tablespoon kinako and a drizzle of dark brown sugar syrup*.

*to make dark brown sugar syrup: Place 25ml water and 50g dark brown sugar in a pan. Heat the mixture till the sugar dissolved. Remove from heat. Add in 1/2 tablespoon honey, stir to combine. Leave to cool before using. (Double or triple the recipe accordingly to yield more syrup).

Recipe source: adapted from Okashi – Sweet treats made with love by Keiko Ishida

Wednesday, 13 November 2013

veggies in a cake


The first time I made this carrot chiffon cake I tested it with my new Bosch kitchen machine.


The Bosch mixer is able to whisk the egg whites a lot faster, and appears to create more volume than a handheld electric whisk. However, having said that, a handheld machine is also equally good for beating egg whites although you will have to hold it with one hand while juggling the other when adding the sugar. I am still not very comfortable with using the Bosch mixer to beat the egg whites as I have this nagging fear that I would over beat it ^^"

As I was writing this post, I was informed that Bosch has launched a special edition collection of coloured variations of the MUM5 kitchen machine. See here for the fun colours available!


My latest bake of this same cake...pardon the poor image quality, I couldn't help but to snap a picture when it rose so beautifully in the oven.


Besides grated carrot, I have also added in some orange juice...so it is actually a fruit and veg cake ;)


I have tried baking with a 17cm and a 18cm chiffon pan. The 18cm pan yield a shorter cake though.

I can't remember since when...I have started to use a ballon whisk to fold the egg whites to the yolk batter. I find that it is much easier to fold without deflating the batter with a ballon whisk. Just before pouring the batter into the pan, I will switch to the spatula to make sure the bottom is also well mixed. If you have been using a spatula to do the folding, maybe you would want to experiment with a balloon whisk, hope it works well for you too.


I must thank my cyberfriend VB for sending me this lovely Laura Ashley tea towel :) It comes with a cute instruction on how to cook eggs!


This recipe uses 4 yolks and 4 whites...which is good, as sometimes I find it troublesome either to save extra whites or how to use up an extra egg yolk ^^"

As with any other chiffon cakes, the texture is light and moist. No 'raw carrot smell' is detected and it doesn't taste very sweet, maybe because the oranges I bought were usually very sour. The sweetness is just right for me, but for those who have got sweet tooth, this may not appeal to you?? I could eat a quarter of the whole cake without feeling guilty ;)

I have tried baking this cake with grated carrot (raw) and also cooked carrot (boiled and mashed). Both gave the same result. However, when left for up to 2 days (room temperature), I noticed that for the cooked carrot version, the carrot bits started to 'sweat' (release moisture) and the crumbs near the carrot bits got damped. This doesn't happen to the raw carrot version, so I am sharing the recipe (raw carrot version) with you. Do share with me your experience if you ever have a chance to try this, thank you!


Carrot Chiffon Cake

Ingredients:

(makes one 17cm/18cm cake)

4 egg yolks (use large eggs)
20g caster sugar
50g vegetable oil
30ml freshly squeezed orange juice
1 teaspoon vanilla extract
80g cake flour
50g carrot, grated

4 egg whites (use large eggs)
45g caster sugar


Method:
  • Place egg yolks in a mixing bowl. With a balloon hand whisk, whisk the yolks a little. Add in sugar and whisk to combine. Add in vegetable oil gradually, whisk to combine. Add the orange juice and vanilla extract, whisk to combine. Add in grated carrot. Mix to combine. Sieve over the flour and whisk till the flour is fully incorporated. Do not over mix. Set aside.
  • Place egg whites in the mixing bowl of the mixer, make sure the bowl is clean and dry. Beat egg whites on low speed until mixture becomes frothy and foamy. Add half of the sugar and turn to high speed and beat the mixture. Continue to add in the remaining sugar mixture and beat until the egg whites reaches the soft peak stage.The soft peak stage is reached when the peaks of the whites curl over and droop slightly. The egg whites should appear smooth and glossy.
  • Add the beaten egg whites into the egg yolk batter in 3 separate additions, each time folding gently with a spatula (or a balloon whisk) until just blended.
  • Pour batter into a 17 or 18cm chiffon tube pan (do not grease or line the pan). Tap the pan lightly on a table top to get rid of any trapped air bubbles in the batter.
  • Bake in pre-heated oven at 180 degC for 30 mins, or until a toothpick inserted into the centre comes out clean, when lightly pressed the cake will spring back. Invert the pan immediately and let cool completely before unmould. To remove the cake from the pan, run a thin-bladed knife around the inside of the pan and the center core. Release the cake and run the knife along the base of the pan to remove the cake. Store in air tight container and best consumed within two days.

Thursday, 16 May 2013

Green Tea Chiffon

I doubt I'll ever get tired of baking and eating chiffon cakes. Inspired by my baking friend's matcha chiffon cake, I couldn't help but crave for one ;)


I followed the same recipe as what my friend did, which she has taken from the book Okashi Treats: Sweet Treats Made With Love by Keiko Ishida. Although I don't own this book I have seen the recipe posted by fellow blogger pal, Small Small Baker. It seems like a very popular recipe as I have also come across another beautiful creation by 鲸鱼蓝蓝蓝. As I am writing this post, another blogger pal, the Baking Scientist has also shared her matcha chiffon cake baked in cupcakes :)

I went ahead to adopt SSB's recipe since I am also using a 17cm or 7" tube pan. I guess I have over-beaten the egg whites a litte, the cake didn't rise as tall as my usual chiffon cakes. In fact, it started to shrink even before the baking time was up. By the time I took it out from the oven, the dome had already flattened...as flat as the horizon! Either I have over-beaten the whites(which I thought I didn't) or it could be the existence of corn flour(which I doubt so), I had difficulties trying to fold and blend the meringue to the yolk batter. The finished batter was not as thick and voluminous as I have expected. Maybe it was the number of whites used...this recipe uses equal number of yolks and whites whereas the usual chiffon cake recipes I have followed call for an extra white.


Nevertheless, the texture was still soft and cottony. When I asked my younger child whether he liked it, he commented "好吃,不过没有味道"(loosely translated as, nice but not much flavour). How frank and yet very diplomatic! Either our taste buds were not functioning well or I should have used more matcha powder, the green tea flavour was not particularly prominent. The next time I were to make this, I will certainly add more matcha powder...but that has to wait, as I am now itching to try the same Kinako (Japanese soya bean powder) chiffon cake my baking friend has baked!

我一向来都不爱跟风,不过这次抵挡不住一股从四面飘来的绿茶戚风蛋糕香,也跟着做了一个‘绿油油’的戚风。不过我的功夫不到家, 蛋糕还没出炉就开始缩了。看来务必要花时间磨一磨刀子。还好蛋糕还是超绵,只是我嫌绿茶味不够浓,下次出手要重一点。可是现在又心痒痒想买包黃豆粉來玩玩 (^^")


Green Tea Chiffon Cake

Ingredients:
(makes one 7" cake)

3 egg yolks (use large eggs)
10g caster sugar
35g vegetable oil (I used canola oil)
50g fresh milk (original recipe calls for water)
45g cake flour
6g matcha green tea powder

3 egg whites (use large eggs)
45g caster sugar
6g corn flour

Method:
  • Place egg yolks in a mixing bowl. With a manual hand whisk, whisk the yolks a little. Add in sugar and whisk to combine. Add in vegetable oil gradually, whisk to combine. Add the fresh milk, whisk to combine. Sieve over the flour and matcha powder, whisk till the flour is fully incorporated. Do not over mix. Set aside.
  • Mix the 45g caster sugar with the corn flour.
  • In a clean, dry mixing bowl, beat egg whites with a handheld electric mixer on low speed until mixture becomes frothy and foamy. Add half of the sugar and corn flour mixture and turn to high speed and beat the mixture. Continue to add in the remaining sugar mixture and beat until the egg whites reaches the soft peak stage.The soft peak stage is reached when the peaks of the whites curl over and droop slightly. The egg whites should appear smooth and glossy. (Do not over beat the whites still stiff, it is better to beat the whites still soft peaks for easy folding with the yolk batter.)
  • Add the beaten egg whites into the egg yolk batter in 3 separate additions, each time folding gently with a spatula until just blended.
  • Pour batter into a 7" chiffon tube pan(do not grease the pan). Tap the pan lightly on a table top to get rid of any trapped air bubbles in the batter.
  • Bake in pre-heated oven at 180 degC for 30 mins, or until a toothpick inserted into the centre comes out clean, when lightly pressed the cake will spring back. Invert the pan immediately and let cool completely before unmould. To remove the cake from the pan, run a thin-bladed knife around the inside of the pan and the center core. Release the cake and run the knife along the base of the pan to remove the cake.
Recipe source: adapted from here.

Friday, 10 May 2013

Mango Chiffon Cupcakes

Cupcakes are something that I hardly ever make.


I prefer muffins since most cupcakes recipes calls for a lot more sugar and fat. But with my recent success with baking chiffon cakes in cups, I have adventured into baking a lighter version of cupcakes such as these mango chiffon cupcakes.


With mangoes found in abundance at this time of the year, I have been carting loads of Thai mangoes from the supermarket. I simply couldn't resist putting the fresh, blemishes-free fruits inside my basket each time I spot them at the fruits section ;)

I couldn't find any suitable mango chiffon cake recipe so I tweaked this cranberry yoghurt chiffon recipe as I reckoned that mango puree somewhat has the same consistency of yoghurt?

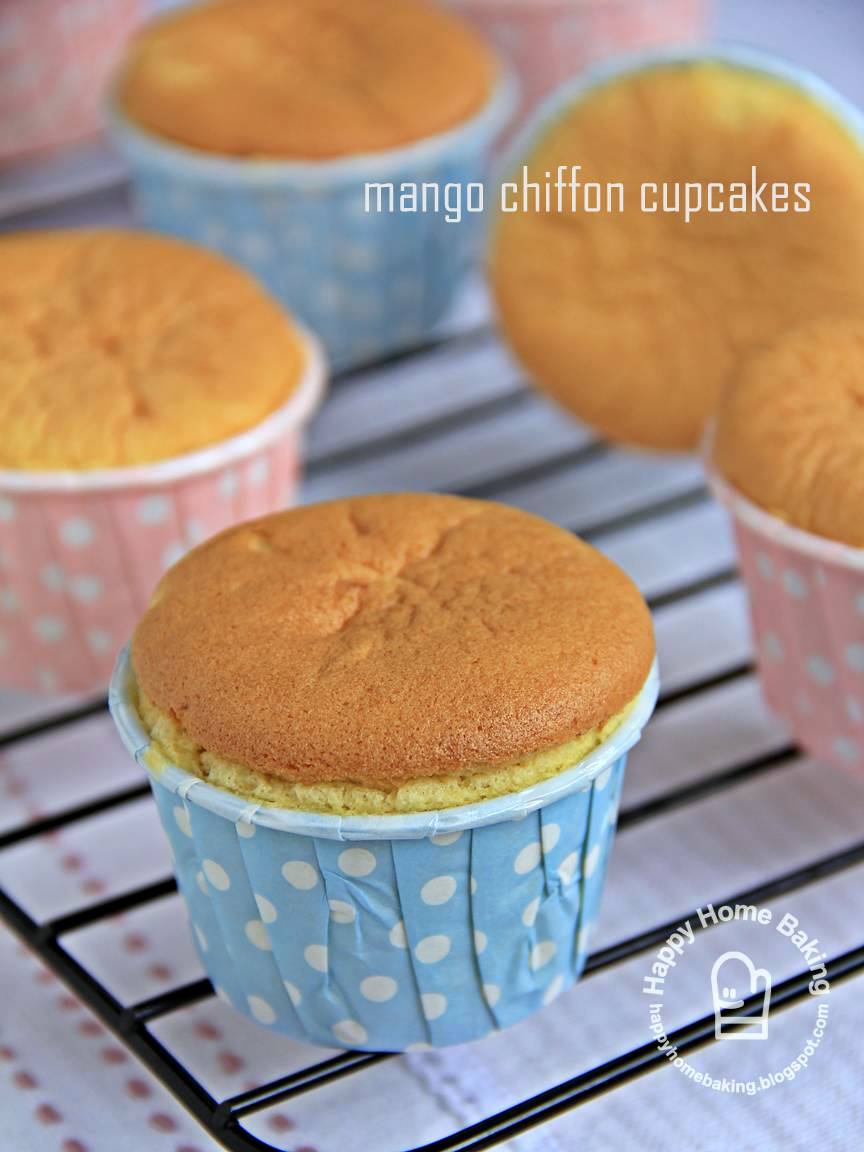
The mango chiffon turned out fabulous! The chiffon sponge rose high and mighty when they were baking in the oven...they were at least an inch above the rim, I'm not kidding! Unlike my previous attempt at baking chiffon cakes in square paper cups, the cake didn't crack all over which made them looked really like huat kuehs(steamed cakes). This time, with my usual round muffin paper cups, the 'high-rised' cakes reminded me of souffles or cakes topped with macaroons!

My younger child went 'woah!' when he first caught sight of the cupcakes in the oven...upon closer scrutiny he went 'oh dear! oh dear!' when the batter appeared to be in danger of overflowing anytime. I told him matter-of-factly, "Don't worry, they will deflate upon cooling." "Why?" he asked. "Hmmm...because when it is hot, it expands, when it is cold, it contracts. The air bubbles inside the cake batter expands during baking, and contracts or pops when cooled. The cake will collapse and sink." I don't know whether my answer is correct but he was happy with it, lol.


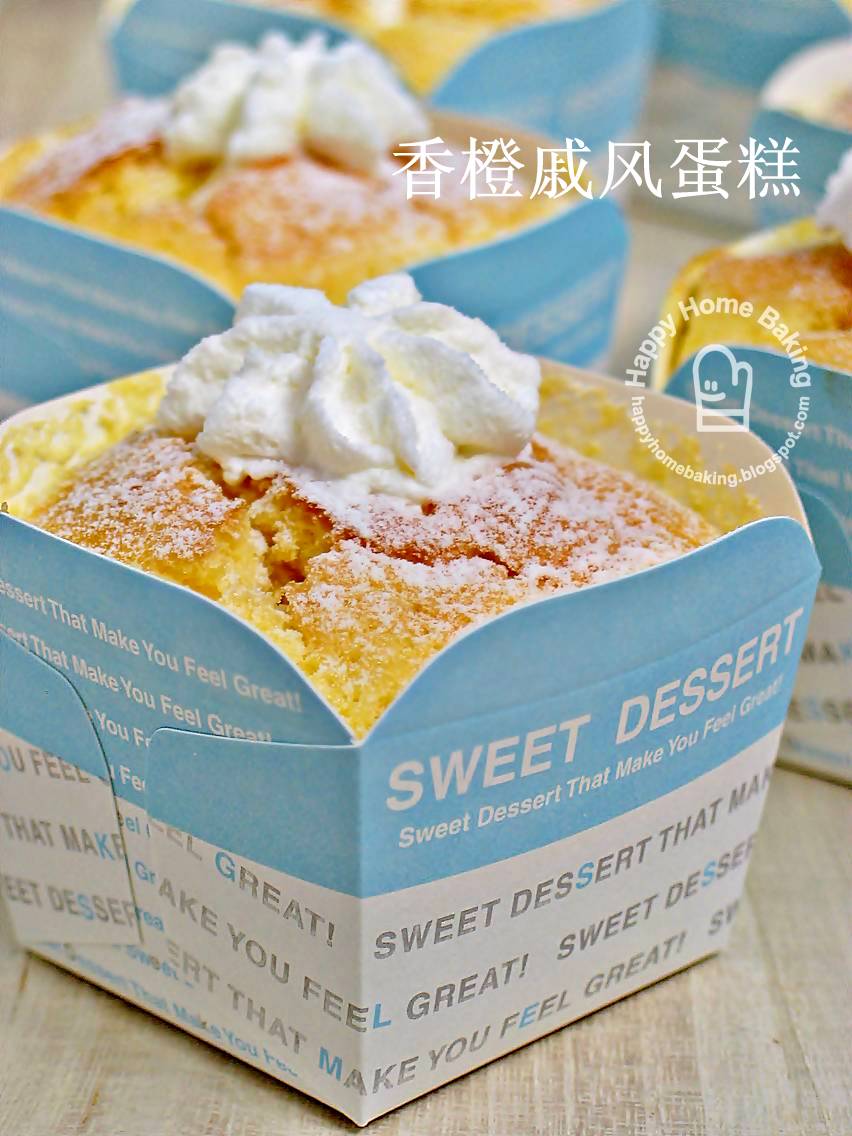
With the well baked chiffon cakes, I went on to prepare the filling cum frosting. The filling or frosting on the cupcakes is a mixture of whipping cream, yoghurt and fresh mangoes. It is much lighter than buttercream and taste a lot like ice cream. Well, it has to be since I have followed this mango yoghurt ice cream recipe :)


Just like Hokkaido chiffon cupcakes, I have filled the inside of each cupcake with the mango frosting. Although the texture is a bit denser than chiffon cakes baked in a tube pan, it still taste light and very refreshing...the mango flavour is very prominent even without any artificial flavourings. These cupcakes are certainly less sinful than butter cupcakes...but, that is, as long as you can refrain from eating a few at one go, lol!


I shall end my post with my favourite picture of theses chiffon cupcakes...love the nice wrinkles on top.

I doubt I will ever fall out of love with Baking.

Baking is Amazing...Baking is Fun!

Happy Baking everyone!


Mango Chiffon Cupcakes

Ingredients:
(makes 10 cupcakes)

for the chiffon cupcakes:
3 egg yolks (use large eggs)
25g caster sugar
50ml vegetable oil
100g fresh mangoes (use sweet, well ripened mangoes)
1 teaspoon lemon juice
80g cake flour

4 egg whites (use large eggs)
55g caster sugar


for the filling/frosting:
80g fresh mangoes (use sweet, well ripened mangoes)
25g caster sugar
75g mango flavoured yoghurt (I used peach and mango flavour)
125ml non-dairy whipping cream


Method:

to make the cupcakes:
  • Blend 100g mangoe flesh till smooth. Set aside.
  • Place egg yolks in a mixing bowl. With a manual hand whisk, whisk the yolks a little. Add in sugar and whisk to combine. Add in vegetable oil gradually, whisk to combine. Add the mango puree, lemon juice, whisk to combine. Sieve over the flour and whisk till the flour is fully incorporated. Do not over mix. Set aside.
  • In a clean, dry mixing bowl, beat egg whites with a handheld electric mixer on low speed until mixture becomes frothy and foamy. Add half of the sugar amount and turn to high speed and beat the mixture. Continue to add in the remaining sugar and beat until the egg whites reaches the soft peak stage.The soft peak stage is reached when the peaks of the whites curl over and droop slightly. The egg whites should appear smooth and glossy. (Do not over beat the whites still stiff, it is better to beat the whites still soft peaks for easy folding with the yolk batter.)
  • Add the beaten egg whites into the egg yolk batter in 3 separate additions, each time folding gently with a spatula until just blended.
  • Spoon batter into paper cups till it reaches the rim. Place paper cups onto baking tray and bake in pre-heated oven at 180 degC for 12~15 mins, or until a toothpick inserted into the centre comes out clean. Leave to cool completely. (Note: the cupcakes will rise well above the rim during baking, but will shrink upon cooling.)
to make the filling/frosting:
  • Blend mango flesh, sugar, yoghurt until the mixture becomes smooth. 
  • With an electric mixer, whisk non-dairy whipping cream till stiff. Fold in the whipped cream to the mango mixture. Blend thoroughly.
to assemble:
  • Fit piping bag with a piping tip, fill the bag with the filling. Gently push the piping tip into the centre of each cupcake and fill the inside with the filling. Then pipe the whipped cream on top of the cupcake.
  • Leave to chill in the fridge before serving.
Recipe source: chiffon cupcakes adapted from 好吃戚风蛋糕轻松上手, 福田淳子

Wednesday, 24 April 2013

not my everyday muffins

These are not your everyday muffins.

They are uji matcha or green tea muffins topped with mini chocolate chips...

made, not by the usual 'muffin method' of mixing the dry with the wet ingredients, but by creaming butter and sugar...

and, there's a little surprise in each of these delicious cuppies...


what's the surprise?! A ball of cream cheese in the middle!


Well, the cream cheese is meant to be in the middle, but mine was too close to the top ;)

I didn't blame myself as I did follow the instruction closely, that is, to fill the muffin cups to half full before adding the cream cheese balls. I believe if I were to fill it to 1/3 full, the cream cheese would be right there in the middle. It also turns out that the cream cheese became tapered and not round like a ball. I think it has to do with my shaping. I am not complaining, since there is a 'heart' in every one of those muffins ;) I have taken the recipe from a cookbook ' Home Baking 星期天的烘焙时光' (loosely translated as: Home Baking on a Sunday). My baking friend suggested that I could try out this recipe after I told her I have some left over cream cheese from the matcha cheesecake tart. I am so glad I heeded her advice!


These aren't my everyday muffins. They're indulgent!

The texture is tender, moist, much softer and lighter than a slice of pound cake. I guess they taste just like cupcakes, minus the frosting. There is also a good balance of flavours...matcha, cream cheese and chocolate...each having its own distintive taste, yet, with not one flavour overpowering any of the others. What can I say? Every bite is a delight!

Oh, before I forget, they taste really good when freshly baked! So, if want to give this a try, do plan ahead, you won't regret enjoying them with your morning or afternoon cup of tea, warm and fresh from the oven :)


I am submitting this post to Aspiring Bakers #30: it's Tea time! (April 2013) hosted by Food Playground.


Matcha Green Tea Cream Cheese Muffins

Ingredients:
(makes 10, muffin cup size: diameter 6cm top, 4.5cm bottom, ht 3.5cm)


150g cream cheese, softened at room temperature
15g icing sugar

85g unsalted butter, softened at room temperature
100g caster sugar
1 large egg, lightly beaten
145g cake flour
5g matcha green tea powder
1 teaspoon baking powder
1g salt (about 1/4 teaspoon)
80g milk
some mini chocolate chips


Method:
  • With a wooden spoon or a spatula, mix cream cheese in a mixing bowl still smooth. Add in icing sugar, mix to combine. Divide the mixture into 10 portions (about 15-16g each). Shape each into round balls. Leave to chill in fridge.
  • Place butter in a mixing bowl, beat with a balloon whisk or an electric mixer till smooth. Add the sugar and continue to beat until the mixture turns pale, light and fluffy.
  • Gradually add in the egg, little by little, whisking after each addition. 
  • Sieve over the flour, matcha powder and baking powder. Fold with a spatula until just combined.
  • Add the salt, stir to combine.
  • Add in the milk gradually and fold with spatula until just combined.  
  • Fill paper muffin cups with batter till about 1/3 full, add the cream cheese balls to each muffin cup. Spoon over the remaining batter till each muffin cup is almost full. Sprinkle top with some mini chocolate chips.
  • Bake in preheated oven at 180degC for about 20-25mins until the top is lightly browned or until a toothpick inserted into the side comes out clean.
Recipe source: adapted from Home Baking 星期天的烘焙时光


Friday, 15 March 2013

cranberry orange chiffon cake

I have a leftover egg white from making a batch of cookies, what better way than to save it for a chiffon cake!


I am back to making an orange cointreau chiffon cake using the same recipe as these chiffon cupcakes. The only difference is, I added in some dried cranberries as I love it in my bakes, be it cookies, bread or cakes.


To prevent the dried cranberries from sinking to the bottom of the pan, I poured a small amount of the finished batter into pan, just enough to fill the base of the pan. Then I mixed in the dried cranberries with the rest of the batter before pouring everything into the pan. The cake was baked to a nice golden brown, and upon unmolding, I knew this extra effort did help. The dried cranberries did not sink to the bottom (now the top of the cake).


This cake is very light and has a very refreshing taste. The orange flavour is distinct yet subtle while the tangy-sweet dried cranberries gives a perfect balance to the sweet crumb. This recipe is definitely a keeper, I will certainly be making it again and again!


Cranberry Orange Chiffon Cake

Ingredients:
(for 17cm tube pan)

3 egg yolks
25g caster sugar
35ml vegetable oil
60ml orange juice
1 teaspoon Cointreau (I used 2 teaspoons)
zest from 1 orange
80g cake flour

4 egg whites
45g caster sugar

40g dried cranberries
some cake flour for dusting

Method:
  1. Chop dried cranberries into smaller pieces. Coat with cake flour and sieve to remove excess flour. Set aside.
  2. Place egg yolks in a mixing bowl. With a manual hand whisk, whisk the yolks a little. Add in sugar and whisk to combine.
  3. Add in vegetable oil gradually, whisk to combine. Add orange juice, cointreau and orange zest, whisk to combine. Sieve over the flour and whisk till the flour is fully incorporated. Do not over mix. Set aside.
  4. In a clean, dry mixing bowl, beat egg whites with a handheld electric mixer on low speed until mixture becomes frothy and foamy. Add half of the sugar amount and turn to high speed and beat the mixture. Continue to add in the remaining sugar and beat until the egg whites reaches the soft peak stage.The soft peak stage is reached when the peaks of the whites curl over and droop slightly. The egg whites should appear smooth and glossy. (Do not over beat the whites still stiff, it is better to beat the whites still soft peaks for easy folding with the yolk batter.)
  5. Add the beaten egg whites into the egg yolk batter in 3 separate additions, each time folding gently with a spatula until just blended. 
  6. To prevent the dried cranberries from sinking to the bottom of the pan, first pour a small portion of batter into a 17cm tube pan (do not grease the pan), just enough batter to fill the base of the pan. 
  7. Add the prepared dried cranberries into the remaining batter in the mixing bowl. Fold with a spatula until just blended. Do not over mix. Pour batter into the pan. Tap the pan lightly on a table top to get rid of any trapped air bubbles in the batter.
  8. Bake in pre-heated oven at 180 degC for 30 mins, or until a toothpick inserted into the centre comes out clean, when lightly pressed the cake will spring back. Invert the pan immediately and let cool completely before unmould. To remove the cake from the pan, run a thin-bladed knife around the inside of the pan and the center core. Release the cake and run the knife along the base of the pan to remove the cake.
Recipe source: adapted from 好吃戚风蛋糕轻松上手, 福田淳子

Thursday, 14 February 2013

Orange Chiffon Cake in cups

Happy Lunar New Year to everyone!

Pardon my tardiness in updating my blog and thousand apologies especially to those who still hop over to this tiny blogosphere once in a while.

I do bake regularly but I am always going back to my favourite recipes such as pandan chiffon, the usual bread loaves and buns, simple muffins and cookies. Nothing inspiring or worth mentioning...


except for this latest Orange Chiffon cake which I baked in paper cups instead of the usual tube pan. I have meant to give the cake away, and what better way to present the cake using these lovely muffin cups :)


I piped whipping cream into each cup cakes. just so to start using the carton of non-dairy whipping cream I bought a month ago. The end result looks quite similar to the popular Hokkaido chiffon cake though.


The chiffon cake texture was soft and light although they were baked in paper cups. While baking in the oven, they rose beautifully over the rim, almost on the verge of overflowing. Most of them cracked...but I have no issues with cracked chiffon cakes, in fact I love the cracks ;)

Once out of the oven, they started to shrink, I didn't invert the cakes (or should I??) and left them to cool right side up. Very soon, the cakes deflated to just the right height...not falling short of the base of the four flaps on each square cup. It was my first attempt at piping cream into a cup cake. I have no idea how to go about it but to rely on my gut feel. I simply forced the piping tip into the centre of the cake and squeeze in as much cream I could, I stopped piping when the cream started flowing out from the side of the piping tip. I used the remaining cream to pipe rosettes on the tops, so as to cover the holes. I kept my fingers crossed that I was doing the right thing...that I got enough whipping cream into the cake. Fortunately, these little cuppies were meant for family, I have no qualms about giving away half-filled cakes to family members, actually I didn't even taste one before I gave them away, something I wouldn't do if they were meant for friends ;) 


It turn out that I got the piping right as the cuppies were filled with quite a substantial amount of cream, although I think the cakes could take in more. The taste, at least the whipping cream, was rather close to those store bought Hokkaido cake which I have tried. I received positive comments such as...'they taste better than store bought ones'. Credit must go to the orange chiffon cake recipe which I have taken from my favourite chiffon cake book, 好吃戚风蛋糕轻松上手. The cake was delicious and full of flavors as they were made with orange juice, orange zest and Cointreau (an orange-flavoured liqueur)...another baking ingredients which I have just used even though I bought it more than a year ago. 

With this little experience I have gained, I expect myself to bake some real Hokkiado chiffon cupcakes soon...


Orange Chiffon Cake in cups

Ingredients:
(makes about 15 cupcakes)

5 egg yolks
40g caster sugar
55ml vegetable oil
95ml orange juice (from about two oranges)
2 teaspoons Cointreau
zest from 1 orange
130g cake flour

7 egg whites
70g caster sugar

for frosting:
about 240ml (1 cup) non-dairy whipping cream for piping
1 teaspoon Cointreau
some icing sugar for dusting

Method:
  1. Place egg yolks in a mixing bowl. With a manual hand whisk, whisk the yolks a little. Add in sugar and whisk to combine. Add in vegetable oil gradually, whisk to combine. Add orange juice, cointreau and orange zest, whisk to combine. Sieve over the flour and whisk till the flour is fully incorporated. Do not over mix. Set aside.
  2. In a clean, dry mixing bowl, beat egg whites with a handheld electric mixer on low speed until mixture becomes frothy and foamy. Add half of the sugar amount and turn to high speed and beat the mixture. Continue to add in the remaining sugar and beat until the egg whites reaches the soft peak stage.The soft peak stage is reached when the peaks of the whites curl over and droop slightly. The egg whites should appear smooth and glossy. (Do not over beat the whites still stiff, it is better to beat the whites still soft peaks for easy folding with the yolk batter.)
  3. Add the beaten egg whites into the egg yolk batter in 3 separate additions, each time folding gently with a spatula until just blended.
  4. Pour batter into paper cups till it reaches just before the base of the flaps. Place paper cups onto baking tray and bake in pre-heated oven at 180 degC for 12~15 mins, or until a toothpick inserted into the centre comes out clean. Leave to cool completely.
  5. With an electric mixer, beat non dairy whipping cream and cointreau until stiff. Fit piping bag with a piping tip, fill the bag with the whipped cream and pipe the cream into the centre of the cake. Dust with icing sugar and leave to chill in the fridge before serving. 
Recipe source: adapted from 好吃戚风蛋糕轻松上手, 福田淳子

Friday, 7 December 2012

Mini Oreo Cheesecake

To my regular visitors, my apologies for the long silence.

To make up for my tardiness in updating this blog, here's a little treat from my kitchen to yours...
mini upside down oreo cheesecakes...


A month ago, I was quite caught up planning for a holiday trip...it was a last minute decision as we almost gave up the idea when we couldn't get on the flight. By chance or fate, (or rather, thanks to my never-give-up attitude of checking the airlines system every other few hours) I managed to get all of us booked on the same flight. As we neither speak or read Korean language, I had to make sure I did a thorough job of getting into the minute details to prevent any hiccups during our trip. My 'strengths' in micro-managing pays off. Everything went well, we got to visit the places we had planned and didn't have much problem finding the popular makan(eating) places. As usual, we were on a shoestring budget, everything was DIY, backpackers style...only difference was, instead of carrying backpacks we maneuvered the busy streets and from train stations to stations with cabin bags in tow ;)


Our holiday trip was a real short one...time flies and in no time we are back to our daily mundane lives :(
In between doing loads after loads of laundry, I took time to 'spot clean' my fridge. Lying in the fridge was this block of cream cheese, crying out loud to me that I was right on time, it would exceed the expiry date the very next day!

Instead of procrastinating and end up having to throw it into the bin the next day, I googled for suitable recipes that calls for cream cheese. I remember seeing some oreo cheesecake recipes some time back, and it was a good thing that the recipe requires very basic baking ingredients, and, I am never short of oreos! The only problem was, I didn't have any sour cream on hand, but I do have yoghurt in the fridge. I went ahead and replaced the sour cream with yoghurt. I guess not much damage was done...


I baked them with paper muffin cups...one whole oreo cookie is placed inside each cup before filling it up with the batter. The preparation was rather fuss free, quick and simple. I followed the baking time but extended it for another couple of minutes as I did the skewer test and the centre was still wet although the top was set. For fear of over baking, I turned off the heat even though the inside was still not set. I believe they would be fully set in the fridge (upon cooling, the cakes have to be chilled in the fridge before consuming).


My little baking retreat was a great success. These mini cheesecakes were really delicious, and I thought they looked very lovely with the oreo cookies on top :)

They are excellent after dinner treats even though I am not an oreo fan, and I am sure they would jazz up any tea time tables especially when there are guests around ;)


Mini Oreo Cheesecakes

Ingredients:
(makes about 10)

15 Oreo cookies (10 leave as whole, 5 remove cream and coarsely chopped)
8oz pack cream cheese, room temperature
50g caster sugar
1/2 teaspoon vanilla extract
1 large egg, lightly beaten, room temperature
60g sour cream (I replaced with plain yoghurt)

Method:

  1. Preheat oven to 135 DegC (275°F).
  2. Place one whole cookie in each of the 10 muffin paper cups (or line muffin tins with paper liners). 
  3. Beat cream cheese with an electric mixer (medium high speed) until smooth. 
  4. Add in sugar, beat until just combined, scrape down the sides of the bowl when necessary.
  5. Add in vanilla extract, beat until just combined. 
  6. Gradually drizzle in the egg, beat to combine, scrape down the sides of the bowl when necessary. 
  7. Add in sour cream, beat till just combined. 
  8. Add chopped cookies, fold with a spatula. 
  9. Fill each muffin cup almost to the brim. Bake for about 22~25 minutes until the filling is set and not jiggly. Transfer to wire rack, leave to cool completely. Cover or store in airtight containers and leave to refrigerate at least 4 hours or overnight. When ready to serve, remove cake from muffin cups, serve cookies sides up.

Recipe source: adapted recipe from here.


Wednesday, 23 May 2012

chiffon salé

No, I am not selling chiffon cakes, nor is there any chiffon cake on sale. The word salé is a French word, which means salted.


My cyberfriend VB sent me this book "戚风咸蛋糕and戚风甜蛋糕" earlier this year, and it was only last week that I managed to find time to try baking my first savoury chiffon cake...a Bacon and Onion Chiffon Cake!

Except for the reduced amount of sugar, addition of salt, the ingredients and method is similar to any other chiffon cake. Instead of using the combination of mustard and bacon, I replaced it with chopped onions, bacon and freshly ground black pepper. Not knowing that the timing to add the ingredients is quite crucial, I made the mistake of adding the onions and bacons last, that is, after I have folded the whites and yolks batter together. This caused the batter to deflate and as a result, my chiffon cake didn't rise as high :_( Next time I were to make this, I will remember to add the onions and bacons mixture into the yolk batter instead.


This chiffon salé gives a whole new dimension to chiffon cake. If you like savoury pastries, I am sure you will love it..imagine the taste of a slice of this savoury cake, with bits of bacon and onion studded in not too sweet, not salty but pillowy soft cake crumbs. On the other hand, if you have got sweet tooth, you may find the taste weird...just like my better half, to him, all cakes have to be sweet not savoury ;)

If you are game enough, why not give this a try? Who knows, it may lead you to discovering a whole new world of baking...


Bacon and Onion Chiffon Cake

Ingredients:
(for 17cm tube pan)

3 egg yolks (use large eggs*)
10g caster sugar
3g salt
50ml vegetable oil
50ml water
80g cake flour

4 egg whites (use large eggs*)
20g caster sugar

2 slices streaky bacon
70g onion (about half a yellow onion), finely chopped
freshly ground black pepper

(*I used eggs with a nett weight of 55g, about 20g yolk, 35g white)

Method:
  1. Cut bacon into 3~5mm stripes. Pan fry the chopped bacon in a non stick pan till golden. Remove and drain on paper towel. Pan fry chopped onions in the same pan with the oil from the bacon till soft. Mix in the bacon and some freshly ground black pepper. Leave to cool. 
  2. Place egg yolks in a mixing bowl. With a manual hand whisk, whisk the yolks a little. Add in sugar and salt, whisk till the batter turns pale and thick (about 5 mins).
  3. Add in vegetable oil gradually, whisk to combine.
  4. Add in water gradually, whisk to combine.
  5. Sieve over the flour and whisk till the flour is fully incorporated. Do not over mix.
  6. Add in bacon and onion mixture, stir with a spatula to just combine. Set aside.
  7. In a clean, dry mixing bowl, beat egg whites with a handheld electric mixer on low speed until mixture becomes frothy and foamy. Add half of the sugar amount and turn to high speed and beat the mixture. Continue to add in the remaining sugar and beat until the egg whites reaches the soft peak stage.The soft peak stage is reached when the peaks of the whites curl over and droop slightly. The egg whites should appear smooth and glossy. (Do not over beat the whites still stiff, it is better to beat the whites still soft peaks for easy folding with the yolk batter.)
  8. Add the beaten egg whites into the egg yolk batter in 3 separate additions, each time folding gently with a spatula until just blended.
  9. Pour batter into pan (do not grease the pan). Tap the pan lightly on a table top to get rid of any trapped air bubbles in the batter.
  10. Bake in pre-heated oven at 170 degC for 30 mins, or until a toothpick inserted into the centre comes out clean, when lightly pressed the cake will spring back. Invert the pan immediately and let cool completely before unmould. To remove the cake from the pan, run a thin-bladed knife or a off-set spatula around the inside of the pan and the center core. Release the cake and run the knife/off-set spatula along the base of the pan to remove the cake.
Recipe source: adapted from 戚风咸蛋糕and戚风甜蛋糕, 小岛喜和

Saturday, 19 November 2011

cake in a cup

It is more than a month since I last baked something! I was so caught up with cleaning up the house, clearing the clutters, removing old textbooks to make room for new ones, and shopping for winter clothes and gears for our trip. When I have time to take a breather, I would be crawling over the web, looking for ways and means...to climb over the Great fire Wall of China.

We will be spending the year end school holidays in China, where blogger, wordpress, youtube, facebook, twitter are all blocked. After testing out a few alternative ways of climbing over the great firewall, I managed to find a possible solution to update my blog without having to access Blogger. The one that works well is to publish a post via email. So instead of creating a new post in blogger, I have to compose the post within an email. It will be posted once I sent it to my mail2blogger address. The next issue is, how to view my blog post or visit the blogs that I frequent...the way to get around it is to read blog updates via Google reader. However, I won't be able to view the images, only text will be displayed, I tested out RSS feed reader, but it didn't work well. The worst is, I won't be able to leave any comments on blogs or reply to any comments or questions on my own blog post. I will have to be a silent reader until we return...so pardon me if I am not able to answer your questions promptly. Well, at least I get to update my blog!


In my attempt to clear the leftover ingredients in my fridge, I planned to make my favourite Fruit Pastry Cake. However, to save time from lining my cake pan, I baked the cake in paper muffin cups. I also took the liberty to cut down on the sugar amount from 150g to 120g. To speed things up, I transfered the finished batter into a clear plastic bag, snipped off a corner of the plastic bag, and used it like a piping bag to fill up each paper cup. Not only it makes spooning of the batter so much easier, it was neater and no mess!


But, my brain has gone rusty...blame it on the long break in between my baking sessions...when I was about to put the tray of filled paper cups into the oven, I was greeted with a 'dark' oven. I had totally forgotten to turn on the oven! There was no choice but to let the batter wait for the oven to be preheated. I thought it was going to be a gone case...but to my surprise, the cake rose high up over the rim just 15mins into baking :)


Thanks to my baking fairy, the blunder I made didn't affect the texture or taste of the cake at all. Even though it is a cake, it is quite similar to a muffin. It was a real breakfast treat for me as I haven't had any homemade cakes for weeks.

Although this is not a cupcake per se, I will like to submit this Blueberry Cake in a cup to Aspiring Bakers #13: Enjoy Cupcakes! (November 2011), hosted by Min's Blog. I hope it will be accepted :)


Blueberry Cake in a cup

Ingredients:
(makes about 9 cupcakes)

100g unsalted butter, soften at room temperature
120g caster sugar
50g yogurt (plain or blueberry flavour)
3 eggs, (medium size) lightly beaten, room temperature
1 teaspoon pure vanilla extract
210g plain flour
1 teaspoon baking powder
some fresh blueberries


Method:
  1. With an electric mixer, cream butter and sugar till light and fluffy. Add yogurt, mix to combine.
  2. Dribble in the eggs gradually and beat till incorporated in the batter. (The mixture may appear slightly curdled.)
  3. Add vanilla extract, mix to combine.
  4. Sieve over flour and baking powder and mix with a spatula till smooth.
  5. Spoon batter into paper liners, fill it to about 3/4 full. Top with some fresh blueberries (if using frozen berries, do not thaw).
  6. Bake in pre-heat oven at 180degC for 25-30 minutes until golden or a skewer comes out clean when inserted into the centre. 
  7. Transfer to wire rack to let cool completely. Dust the top with some icing sugar if desired. Serve warm.