Showing posts with label Pizza. Show all posts

Wednesday, 14 December 2011

for the lazy baker

Pardon my absence from the blogging world...although I doubt I would be missed by anyone ;)

I am quite disappointed that I am not able to visit my regular blogs here in Beijing. Even though I have set my google readers before leaving home, nothing shows up when I tried to access it here. Well, guess I have to do a lot of catching up when I get back by the end of the year.

Although I am away from home, I don't really feel like I am on holidays. Other than the cold weather and the rather laid-back weekends, our weekdays are just like any other day. My kids will spend the mornings doing their holiday assignments while I reply emails to friends, do my groceries and prepare lunch. In the afternoons, my boys are very much pre-occupied with watching cartoons, playing games and letting off their energy by playing table tennis at the fitness centre. Life is pretty much as usual.


I still get to do my baking, at least once a week, if not more.


One of my latest bake is none other than a simple pizza for our dinner last night.


Believe it or not, this pizza requires No Kneading at all. Perfect for a lazy baker like me!

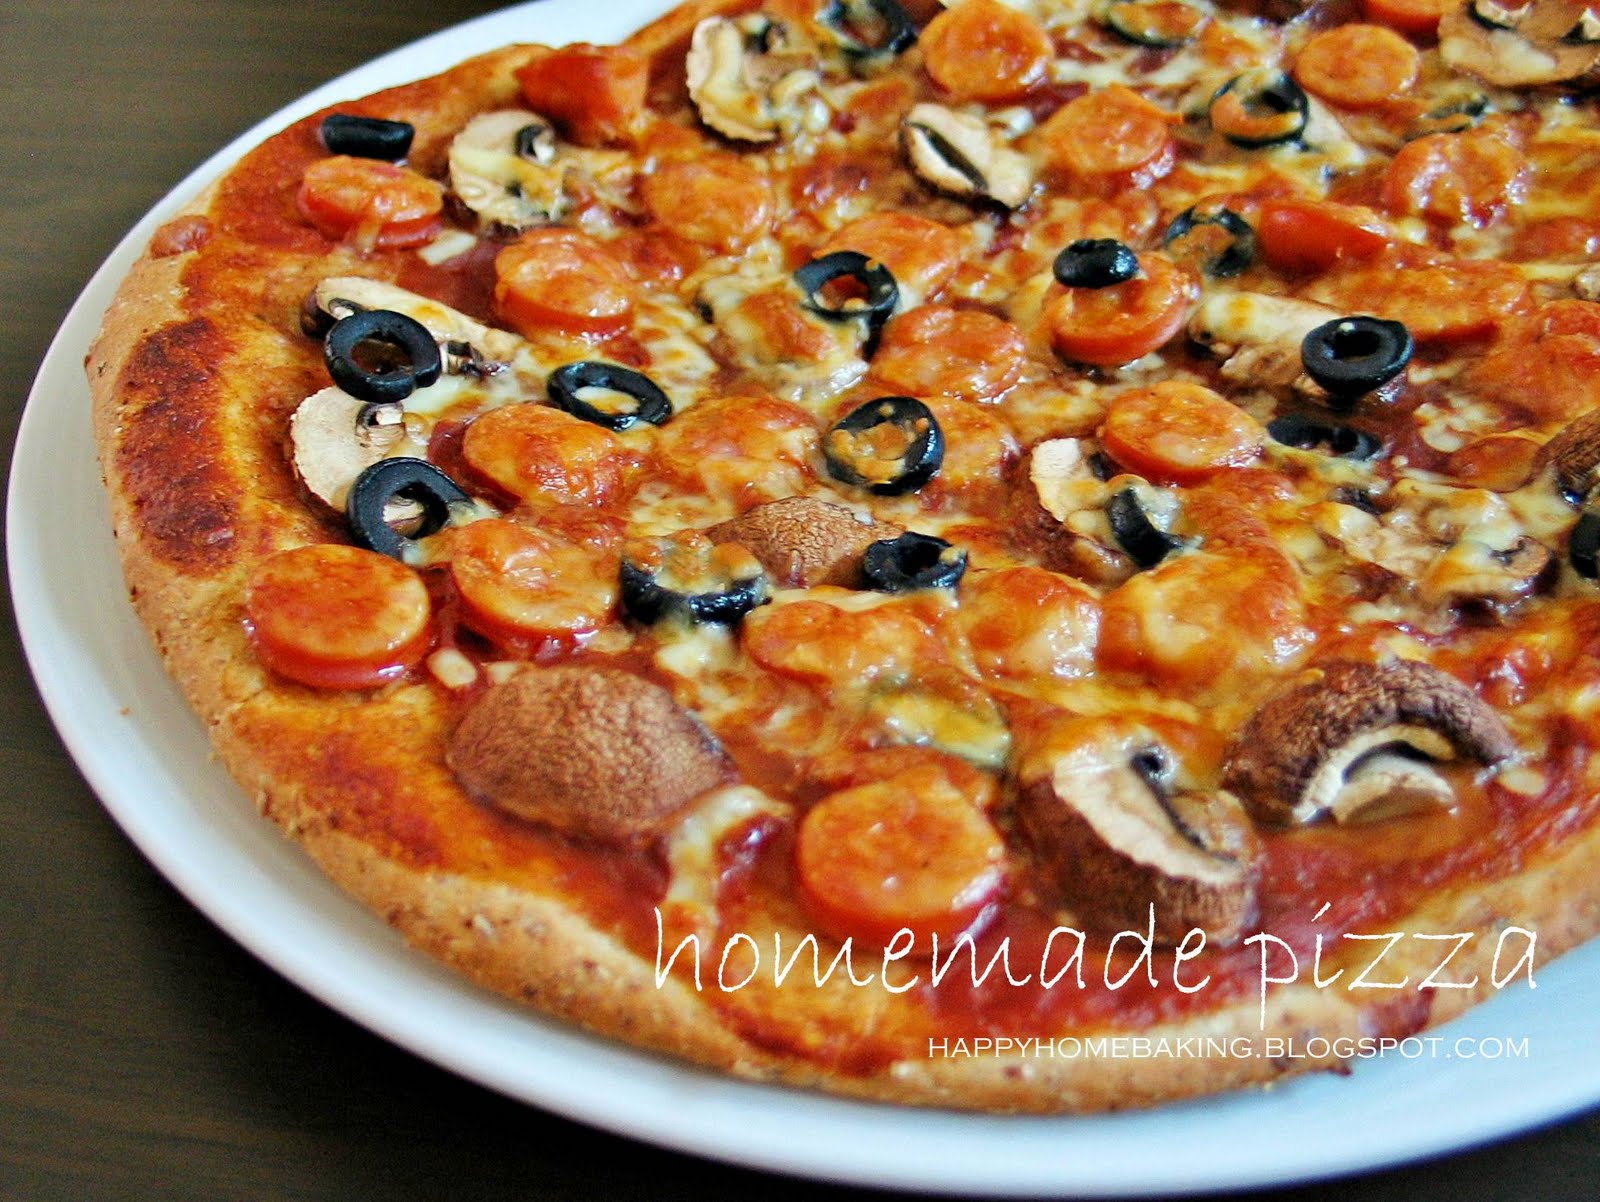
I have made this once, before I left home for Beijing. It was so good that I recommended it to my cake friend right away. She couldn't resist the temptation to make it for her family after I showed her pictures of my boy tucking away into a hearty slice of homemade pizza. I had to share the idea with her since she was the one who introduced me to her magical rolls

...that is, The Pioneer Woman's cinnamon rolls. I used the exact same dough recipe for the pizza base, so, no kneading is required. I did make some slight adjustments, ie, I replaced the milk with plain water, and this time, I also cut down the sugar amount a little (as suggested by my cake friend) so that the pizza base would not taste as sweet. Her's turn out great as well! Even though she didn't take any pictures, I had no difficulties conjuring an image of her boys and hubby wolfing down her delicious, made from scratch, homemade pizza.


I managed to make two pizza from the small batch version of the original PW's cinnamon dough recipe...a big regularly one to fit the drip pan, and a small round 8" 'personal' pan pizza.

Just like making the cinnamon rolls, the dough is as sticky and soft to handle...but after dusting it freely with flour, I was able to flatten the dough and spread it out as thin as possible...no rolling pins required, since I don't have one on hand. Unlikely most pizza doughs, this one is sooo 'baby-bottom' soft that it doesn't shrink back while trying to flatten it. One thing to note is, I spread the dough out directly on the parchment paper...it makes handling the dough much easier.


For once, I didn't make any hawaiian pizza for my children. Instead, I topped it with fresh white button mushrooms, salami slices, capsicums, mini tomatoes...


The texture of the pizza base is very soft and very bread-like...great if you like pan pizza. I love how the combination turns out...especially the fresh, juicy toppings :)

What more can I say, nothing beats a slice of homemade pizza, especially when it doesn't requires much effort. A truly, kneadlessly simple, everyday meal that everyone can put it together, either for their own indulgence or for their loved ones...

so, what are you waiting for?!


No Knead Pizza Dough

Ingredients:

1 cup water
1/4 cup vegetable oil
1/4 cup caster sugar (I used 40g)
1 1/4 teaspoons active dry yeast (I used 1 teaspoon Instant yeast)
2 (250g) cups plus 1/4 cup (30g) plain flour
1/4 teaspoon baking powder (heaping)
1/4 teaspoon baking soda (scant)
1/4 tablespoon salt (heaping)

extra flour for dusting

pizza toppings and grated mozzarella cheese


Method:
  1. Mix water, sugar and vegetable oil in a pan. Scald (heat until just before boiling) the mixture. Leave to cool for 45mins ~ 1 hour.
  2. Place 250g (2 cups) plain flour and Instant yeast in a mixing bowl. Make a well in the centre and add the above mixture. Stir with a spatula until the mixture comes together to form a thick batter. (If using Active Dry Yeast, sprinkle the yeast into the mixture and let it sit for a minute before adding it to the plain flour.) Cover and let the batter sit for at least 1 hour.
  3. Add in the remaining 30g (1/4 cup) flour, baking powder, baking soda and salt. Stir until the mixture comes together. Either go ahead to make the pizza or cover and leave to chill in fridge over night or until needed. If left to chill, check the dough and punch it down by folding with a spatula if the dough rises almost to the rim of the mixing bowl. (Note: dough will be easier to handle if left over night.)
  4. When ready, place a sheet of parchment paper on a baking tray. Dust parchment paper generously with flour, transfer dough onto parchment paper. Dust dough freely with flour, dust hands with flour, flatten and roll out the dough into a thin round or rectangular shape, as desired.
  5. Spread dough with a layer of pizza sauce, top with some grated mozzarella cheese. Arrange toppings over the surface evenly. Top with more grated mozzarella cheese, bake in preheated oven at 200degC for about 15 mins or until the pizza base turns golden brown and the cheese melted.
Recipe source: pizza dough recipe adapted from The Pioneer Woman's cinnamon rolls

Monday, 18 April 2011

lunch for two

To many, cooking a meal for two should be a fairly simple task, but to a lousy cook like me, it is as challenging as cooking for ten. My everyday lunch has to be something that is easily put together otherwise I will be so tempted to just settle for a takeaway. I always zero in for dishes that meet my 3Ms...minimal preparation, minimal cooking which leads to minimal cleaning. The reality is, not many dishes could fall exactly under this category. As a result, I keep going back to the same old dishes week after week.


Pizza happens to be my children's all time favourite. I am sure they will not get sick of it even if I were to make them a pizza every week. However, making pizza from scratch requires time...and a bit more effort than cooking a pot of fish porridge. I could have made the pizza dough in advance and freeze them, but so far I have not done it. I really have yet to accept the idea of stocking up on frozen food. My freezer compartment remains quite empty most of the time.

It was by chance I 'discovered' a quick way to make a pizza while I was writing an email to a blogger pal. I didn't wait too long before I put my idea into actions.


Here's my short-cut version of a homemade pizza. I am sure it is nothing new to many of you. Instead of making the pizza dough from scratch, I made do with store bought loaf bread. The only difference is, I used this local brand, Gardenia focaccia loaf instead of square sandwich loaf. This store bought focaccia is really tasty and delicious on its own...great for making homemade deli subs (see here), and it is the first time I thought of using is as a pizza base. Why didn't I think of that??

I sliced the loaf horizontally into two, spread some meat sauce (minced beef cooked with some chopped onions and ready made tomatoe-based pasta sauce...very much like cooking a simple bolognese sauce) and topped it with mozzarella cheese before popping it into the oven. The meal was prepared under 15 minutes...with minimal preparation, cooking, and cleaning. 


While the cheese was melting away in the oven, my younger child came home from school. I opened the door and just like every other day, I was greeted with a great smile from a very sweaty, dirty looking boy. The next moment, he let out a little squeal, "I smell pizza!"

Thanks to the wonderful aroma of the focaccia loaf, it really smells like pizza whenever I toast the bread in the oven, I attribute it to the generous use of herbs in making this bread.

It was a very satisfying meal for the two of us as it was almost like eating a pan pizza. I was a little surprised when my boy, who is a small eater, helped himself to 5 slices. Either he was very hungry that day, or he loves nothing but pizza ;)

Saturday, 5 June 2010

Wholemeal Goodness

I like to bake with wholemeal flour, be it muffins, cakes, cookies or bread. Besides being a healthier option, wholemeal flour gives my baked goods a nice, nutty texture. So when I first saw Grace's Whole Wheat Pizza crust, I told myself I have to try it right away.


Homemade pizza is becoming a regular lunch treat for my kids. Making pizza at home is not that difficult, in fact, I find making the pizza crust a breeze. There is minimal ingredients used and the dough is pretty easy to knead. One of the best thing about making your own pizza is that you can create whatever you want...which for me would usually depends on what I have in my fridge ;)


I followed Grace's pizza crust closely, except that I added in 1 teaspoon of dried mixed herbs. I liked how the crust turned out...deliciously crispy!


Although I kept reminding myself not to overload the crust, I couldn't help but pile it up with lots of fresh brown button mushrooms, olives, and some leftover sausages. While I don't mind the boring 'pineapple and ham' toppings (a must for my kids though), this mushroom combo remains my all-time favourite. As for the taste, I shall leave it to the photos to speak for itself ;)


Wholemeal Pizza Dough

Ingredients
(make two 8-10" pizza)

100g bread flour
100g wholemeal flour
10g caster sugar
1/2 teaspoon salt
1/2 teaspoon instant yeast
1 teaspoon dried mixed herbs (optional)
110g (110ml) water
10g olive oil

Method:
  1. Place bread flour, wholemeal flour, sugar, salt, yeast and dried mixed herbs in a mixing bowl. Mix well with hand. Make a well in the centre and add the water and olive oil. Using your hand, gradually work the ingredients together to form a soft dough.
  2. Turn dough out onto a lightly floured work surface and knead for 10mins until the dough becomes smooth and elastic. Shape dough into a round ball and place in a lightly oiled mixing bowl. Cover with cling wrap and leave to rise for 1 hr or until double in size.
  3. Turn out the risen dough onto a lightly floured work surface and knock it down to release the air. Give it a few gentle kneading. Divide dough into 2 equal portions. Shape into two balls, cover loosely with cling wrap and let the dough rest for about 10mins.
  4. Roll or press out each portion to a round, about 8~10" in size. Place dough on baking tray lined with parchment paper or on a greased baking pan.
  5. Spread some pizza sauce (I used store bought spaghetti sauce) over the dough to within 1 cm (0.5 inch) of the edge. Arrange a layer of grated cheese (I used grated mozzarella), followed by preferred toppings. Sprinkle the top all over with grated cheese.
  6. Bake in a preheat oven at 220 degC for 12~15mins or until the crust has turned golden and the cheese has melted. Serve warm.
Recipe source: adapted from here.

Thursday, 5 November 2009

Baking with Kids

It seems like I am running into this dangerous situation that I will probably abandon this blog for good. It also doesn't help that we will be away for most part of the year-end school holidays.

I have been wanting to write up this post since last week, but only managed to upload some photos. I can draw up a long list of excuses to justify my tardiness, but I don't think this is fair, especially to those of you who come visit my blog regularly...my thousand apologies!

To make things worst, this post is not something new...it is just an 'extension' from my previous post ^_^"'


Whenever both my kids are at home on a weekdays, we would always make it a point to make homemade pizza for lunch. As usual we made two pizzas...one of them had to be my kids' all-time-favourite, the Hawaiian pizza...with lots of ham and pineapples as toppings.


The other pizza dough was topped with "whatever I can find" ingredients....mushrooms, green peppers, cherry tomatoes, black olives and some left over minced meat.

I made the dough using a new recipe from a cookbook I bought several months ago. There are two basic pizza dough recipes to choose from....thick or thin crust. From this cookbook, I learned that the difference between the two depends very much on the ratio of the bread flour to plain flour used. The greater amount of bread flour will produce a thicker and more bread-like crust since bread flour has got a higher gluten-level. I have also read that some traditional wafer thin crust pizza will use only plain flour, I have always thought that all pizza doughs are made with bread flour, how ignorant of me! For the thick crust recipe a lot more bread flour than plain flour (5:1) is used, whereas the thin crust recipe uses much less (1:2). I went for the thick crust pizza this time.


While I was gathering the ingredients for the dough, my younger kid came along and offered his help...and upon his request, I let him do the mixing. Since my hands are free, I took the chance to take a video clip of the entire mixing process :)


The crust was not as thick as I thought it would be. I was expecting something like a thick focaccia...probably because I have rolled it out too thin. I must say we pretty like the texture, not too thick and yet not too thin! Just to let you know I very much prefer my "whatever I can find" pizza to the ham and pineapples version ;)


Thick Crust Pizza

Ingredients:
(make two 10" pizza dough)

250g bread flour
50g plain flour
1/2 teaspoon salt
1 1/2 teaspoons instant yeast
1/2 teaspoon dried mixed herbs (optional)
1 tablespoon olive oil
180ml lukewarm water


Method:
  1. Place bread flour, plain flour, salt, yeast and dried mixed herbs (if using) in a mixing bowl. Mix well with hand. Make a well in the centre and add olive oil and water. Using your hand, gradually work the ingredients together to form a soft dough.
  2. Turn dough out onto a lightly floured work surface and knead for 10-15mins until the dough becomes smooth and elastic. Shape dough into a round ball and place in a lightly oiled mixing bowl. Cover with cling wrap and leave to rise for 1 hr or until double in size.
  3. Turn out the risen dough onto a lightly floured work surface and knock it down to release the air. Give it a few gentle kneading. Divide dough into 2 equal portions. Shape into two balls, cover loosely with cling wrap and let the doughs rest for about 10mins.
  4. Roll or press out each portion to a round, about 12" in size. Place dough on baking tray lined with parchment paper or on a greased pan.
  5. Spread some pizza sauce over the dough to within 1 cm (0.5 inch) of the edge. Arrange a layer of grated cheese (I used grated mozzarella), followed by preferred toppings. Sprinkle the top all over with grated cheese.
  6. Bake in a preheat oven at 220 degC for 15-20mins or until the crust has turned golden and the cheese has melted. Serve warm.
Recipe source: adapted from 美食新煮张, 手工面包&三明治

Wednesday, 21 October 2009

Tuesday, 7 July 2009

Build Your Own Lunch

This is a much delayed post as I have problem uploading photos to blogger :(

If you are a regular reader of my blog, you would have realised that I need many photos to compose my post as I am really weak at writing. I find it easier to do up a post with lots of photos as my writing is not very different from a Primary 3 picture composition :')

Thanks to Small Small Baker's latest post, I am now able to work around the problem!


My kids love pizza. However, having pizza at the restaurants or even getting them delivered to your door-step can be expensive. So whenever both of them are at home during the school holidays, we will make it a point to build our own homemade pizza. I guess homemade pizza is also a much healthier option.


This time round, I tried another pizza dough recipe from this book "Baking with Kids" by Linda Collister, who happens to be one of my favourite authors. I fell in love with the beautiful illustrations in the book the moment I picked it up from the library shelf. I have bookmarked several of her recipes and this is the very first recipe I tried. I liked the fact that dried mixed herbs is added to the dough as I love the aroma of mixed herbs, be it used in cooking or baking.


I like to involve my kids in my cooking whenever the opportunity arises. I find cooking with my kids very fun, at least it feels good that I am not alone toiling away in the kitchen. My younger child helped me knead the pizza dough with great enthusiasm, while the elder one gave me a hand when it came to slicing up the hams, pineapples and sausages. Both will fight over who to spread the sauce and toppings, and without fail they would smuggle some hams and pineapples while I was not looking.


We made two pizzas from this recipe, Hawaiian...their all time favourite, and another one with my favourite mushroom toppings.


To my delight, the dough was pretty easy to roll out, unlike my past experience with some other recipes. We were able to roll out the the dough till very thin without it shrinking back the moment we lift up the rolling pin.


The resulting crust was rather thin with very crispy edge, although the centre of the pizza was less crisp. Even though I used canned mushrooms, the pizza was still as delicious, the left over sausages gave a nice savory taste to it. We had a fun and hearty lunch that day. I am already looking forward to another round of pizza making soon.


Homemade Pizza Dough

Ingredients:
(make two 12" pizza dough)

200g bread flour
1/2 teaspoon salt
1 teaspoon instant yeast
1/2 teaspoon dried mixed herbs
125ml lukewarm water
1 tablespoon olive oil

Method:

  1. Place flour, salt, yeast and dried mixed herbs in a mixing bowl. Mix well with hand. Make a well in the centre and add the water and olive oil. Using your hand, gradually work the ingredients together to form a soft dough.
  2. Turn dough out onto a lightly floured work surface and knead for 10mins until the dough becomes smooth and elastic. Shape dough into a round ball and place in a lightly oiled mixing bowl. Cover with cling wrap and leave to rise for 1 hr or until double in size.
  3. Turn out the risen dough onto a lightly floured work surface and knock it down to release the air. Give it a few gentle kneading. Divide dough into 2 equal portions. Shape into two balls, cover loosely with cling wrap and let the doughs rest for about 10mins.
  4. Roll or press out each portion to a round, about 12" in size. Place dough on baking tray lined with parchment paper or on a greased pan.
  5. Spread some pizza sauce over the dough to within 1 cm (0.5 inch) of the edge. Arrange a layer of grated cheese (I used grated mozzarella), followed by preferred toppings. Sprinkle the top all over with grated cheese.
  6. Bake in a preheat oven at 200 degC for 15~20mins or until the crust has turned golden and the cheese has melted. Serve warm.
Recipe source: adapted from Baking with Kids by Linda Collister

Tuesday, 25 March 2008

Pizza Express

During the recent one week term break, I grabbed the opportunity to play around with another pizza dough recipe. I have always wanted to try my hands on a homemade thin-crust pizza, and this recipe was the answer to my search.

The recipe requires only a few basic ingredients, and the amount is just right for our family. It only requires 250g of flour to make two 12 inches pizza doughs. After comparing the instructions for this recipe and the previous one that I have tried, I noticed that in order to get a thinner crust, the pizza will have to be baked right away after the topping has been added. Allowing the dough to proof for another 15mins or so before baking will create a slightly puff-up crust.


According to the instructions, I was supposed to be able to roll out the dough into two 12" rounds. Somehow, I didn't manage to reach that size...not even with the help of my younger boy...no matter how hard with pulled and tugged...the dough kept shrinking back. The furthest we could go was about 10 inches. It was easier for the 2nd portion though...probably it was left 'relaxing' on the table for almost 15mins while we were wrestling with the first one ;)

For the first pizza, I used the usual Hawaiian toppings which are my kids favourite.


For the second one, I made it into a vegetarian pizza. I added in my favourite fresh button mushrooms, green and yellow bell peppers and some tomatoes. I was totally clueless whether this one would be edible...as it was the first time I tried using these combination of ingredients.


Well, I was glad to hear that my elder boy gave very good ratings for this veggie version :) In fact, he told me he preferred this over the ham & pineapple toppings. I love the natural juices and sweetness from the fresh ingredients...and the these toppings were real simple to prepare as there is no cooking involved.


The crust was rather thin...although it was still a far-fetched from those biscuit-like thin pizza crusts. My elder boy told me he still prefers a deep pan pizza...and he declared that "the crust must be crispy on the outside and yet soft on the inside!" ;'(


Ingredients:
(make two 12" pizza dough)

250g bread flour
1 teaspoon fast-acting dry yeast
1 teaspoon salt
150ml lukewarm water
1 tablespoon extra-virgin olive oil

Method:
  1. Grease two 30cm (12in) round pizza trays. (I used a baking tray, lined with parchment paper).
  2. Sift flour and salt into a mixing bowl. Mix in the yeast. Make a well in the centre and add the water and olive oil. Using your hands, gradually work the ingredients together to form a soft dough. If the dough is too dry add a few drops of water.
  3. Turn dough out onto a lightly floured work surface and knead for 10 mins until the dough becomes smooth and elastic. Shape dough into a round ball and place in a lightly oiled mixing bowl. Cover with cling wrap and leave to rise for 1 hr or until double in size.
  4. Turn out the risen dough onto a lightly floured work surface and knock it down to release the air. Give it a few gently kneading. Divide dough into 2 portions. Shape into two balls, cover loosely with cling wrap and let it rest for about 10mins.
  5. Roll or press out each portion to a round, about 12" in size. Place dough on prepared tray.
  6. Spread pizza sauce over the dough to within 1 cm (0.5 inch) of the edge. Arrange a layer of grated cheese, followed by preferred toppings. Sprinkle the top all over with grated cheese.
  7. Bake in a preheat oven at 200 degC for 15~20mins or until the crust has turned golden and the cheese has melted. Serve warm.
Recipe source: adapted from Fresh Baked by Louise Pickford

Friday, 7 December 2007

Homemade Pizza again!

For the past few days, I have been hosting sleep-overs one after another for my niece and nephew. It happened that all 4 kids were at home yesterday...and we decided to have a made-your-own Hawaiian pizza lunch.

All 4 of them love Hawaiian pizza...they only wanted ham and lots of pineapples, and nothing else on their pizzas. After comparing a few pizza dough recipe, I decided to go back to the same recipe that I tried earlier, as it seems like the recipes don't vary too far from one another. Furthermore, I knew that the recipe will yield a thicker, pan pizza crust which the kids prefer. Although I would prefer a thin crust. Only my younger boy helped me with the kneading of the dough...the rest were too engrossed with whatever games they were engaged in!


I was a little stressed when all 4 crowded around the kitchen to wait for the dough to be punched down and shaped into small dics. Then it was followed by a few minutes of chaos when 40 fingers were scrambling all over for the toppings. Each of them came up with their own way to 'mark' their personalised pizza.


This was my niece's personal pan pizza...she was clever to top hers with lots of cheese :)


and the rest...served in assorted kiddy plates.

Naturally they enjoyed their own food, and there was not a single word of complaints. I guess, even if they didn't like it, they wouldn't make a noise since they made these themselves ;) From the look of of their faces, and the way they ate their food in such hearty manners, they must have thoroughly enjoyed the meal together!


I sauteed some fresh button mushrooms with butter, added some soya sauce and pepper to taste....and with some leftover hams, I made my own mushroom pizza :D


I took note not to make the same mistake as my previous attempt, and grated the mozzarella cheese coarsely this time. I tried rolling the dough as thinly as possible, hoping to achieve a thinner crust, but the edges were still quite thick and puffy.


With the melted cheese layer on top, the pizza looked so much more appetising as compared to my 1st homemade one.


Even though I didn't use that much of cheese, it will be too fattening if I were to follow the amount stated in most pizza recipes, to my delight, I was able to achieve a small amount of the 'cheese pull' effect. Although this was really nothing compared to those pizzas that you get from pizza outlets!

This pizza was so delicious that I ate 3/4 of it all on my own...without a single feeling of guilt ;p

Sunday, 4 November 2007

Homemade Pizza


I made this Hawaiian Pizza a couple of days back for lunch. As it was the first time I attempted to make a pizza from scratch, I thought a Hawaiian Pizza would be just simple enough for me to handle. In fact, my kids very much prefer Hawaiian Pizza over other toppings. I used the most basic ingredients...grated cheese, canned pineapples and some ham. As for the tomato sauce, I used some leftover store-bought pasta sauce. I wasn't really sure whether the pizza would turn out edible, so I actually had a plan B in mind...ie to bring the kids to the McDonald's if all else failed.

The pizza dough was rather easy to work with as compared to some other bread doughs. There were only basic ingredients such as flour, salt, water, oil and yeast. The dough was not sticky at all, so it was a breeze kneading it. I followed the instructions and knead the dough for about 10 mins by hand. The dough rise beautifully within an hour's time, thanks to the good sunny weather on that morning :)


It was only after reading some pizza-making recipes that I learned that the mozzarella cheese has to be added in two layers...that is, after spreading the pizza sauce over the dough, a layer of cheese has to be added, followed by the toppings, before covering the entire surface with another layer of cheese again. I always thought that the cheese is added only on the top most layer.


Since the recipe is meant for a 12in pizza pan, I knew that I would have extra dough left as my biggest tray is about 10in. So I took out some dough (without even weighing it!) and made 3 mini-pizza (as I was left with the last 3 paper cases).

The pizza took about 25mins to bake, and it turned out that I didn't add enough sauce and definitely not enough cheese! You see, the tool that I used to grate the cheese, is actually not suitable...the grated cheese were too thin...as compared to those ready-grated ones. Hence, the pizza was not cheesy enough :(


Like I have always mentioned, I am blessed with 2 kids who are not very fussy with food...they usually eat whatever I cook for them. I didn't have to execute plan B at all and they ate the pizza with real gusto! I think they were probably very hungry after school, and my elder boy thought that the pizza tasted better than those he had eaten from pizza outlets, lolz! I will certainly make this again during the school holidays, and they will get to make and design their own personal pizza :)

I have included the pizza dough recipe here, for those who are interested to give it a try. Do take note that the recipe will yield a thick crust, similar to pan-pizza. If you are a fan for thin crust, then this is not for you ;)


Ingredients:
(make one 12in pizza dough)

340g (2 3/4 cup) bread flour
2 teaspoons fast acting dry yeast
1/2 teaspoon salt
200ml lukewarm water
2 tablespoons extra-virgin olive oil (I used pure olive oil)

Method:

  1. Use a 30cm (12in) round pizza tray. Grease the tray. (I used a baking tray, lined with parchment paper).
  2. Mix flour, salt and yeast in a mixing bowl. Make a well in the centre and add the water and olive oil. Mix with hand to form a soft dough. If needed, add a little more water.
  3. Turn dough out onto a lightly floured work surface and knead for 10 mins or until the dough becomes smooth and elastic. Place dough in a lightly greased bowl, cover with cling wrap and leave to rise for 1 ~ 1.5hrs until double in size.
  4. Turn out the risen dough onto a lightly floured work surface and knock it down to release the air. Give it a few gently kneading. Roll or press out to a round to fit the pizza tray, place dough on tray.
  5. Spread pizza sauce over the pizza base to within 1 cm (0.5 inch) of the edge. Arrange a layer of grated cheese, followed by preferred toppings. Sprinkle the top all over with grated cheese.
  6. Leave the pizza in a warm place for about 15mins. Preheat oven to 220degC (425 degF)
  7. Bake pizza for 20~25mins or until the crust has risen and is golden and the cheese has melted. Serve warm.
Recipe source: adapted from Baking with Love (Readers Digest)