Thursday, 21 February 2013

culinary experiment: tuna mayo kimbap

This is my very first attempt at making kimbap or Korean style seaweed rice rolls.


The first time I tasted kimbap was along Meokja Golmok (literally translated as let's eat alley), a busy food alley cramped with street food vendors in Nampo-dong, Busan.


We were there to try the famous street food, bibim dangmyeon (glass noodles mixed with vegetables and red pepper sauce). It was included in our 'die die must try' food list after having seen it on 'Tasty Road', a Korean food and travel program. It was quite an experience having to cramp in front of the tiny 'table', with our knees and elbows brushing against each other as we tucked into the delicious bowls of noodles, right in the middle of the alley, out in the cold. It took a while for me to get used to sitting on the low plastic stools as our knees came up to as high as the table (see above picture on left), with our bags and camera on our lap as we ate...there was no space to put our belongings...and not forgetting our cumbersome winter jackets! I really salute the locals, they appeared so at ease and comfortable enjoying their snack food!


Besides the dangmeyeon, we also ordered some chungmu kimbap, mini rice seaweed rolls served with odengs (fishcake) to try. Never mind the food presentation, these mini kimbap and the damgmeyoeon tasted exceptional delicious! I am not able to describe the taste, you have to go try it yourself ;)


It has been more than two months since we came back from our South Korea trip. I thought I have almost recovered from Korean food withdrawal syndrome as the Chinese lunar new year feasting binge took over. But when I saw this easy and simple tuna rice rolls recipe from a cookbook which I borrowed from the library, I started craving for Korean food all over again! This book, 'Good Morning! 每天都要吃早餐: 10分鐘就能上桌的小確幸早餐提案', is actually a collection of breakfast recipes written by a Korean author. I doubt I will ever be able to get these rolls on my breakfast table in 10 mins (as suggested by the title of this cookbook), I made these tuna rolls for a light lunch instead.


Making these tuna mayo seaweed rolls was actually not that difficult for me since I have experience making sushi rolls or maki. Prior to making these mini kimbap, I have always thought kimbap and sushi rolls are the same, at least they look the same to me. It was only after some googling around, I learned that there is actually a difference between the two. The sushi rice is prepared with rice vinegar, sugar and salt; while the kimbap is made with rice that is usually seasoned with sesame oil and salt. I find it much easier to make kimbap as the rice is not as sticky as sushi rice, making it less messy (for me!) to spread it onto to the seaweed. I didn't use dried seaweed sheets meant for rice rolls, I experimented with salted, toasted crispy Korean seaweed sheets instead(that was what I have in my pantry cupboard). Luckily, I was able to roll up the rice rolls neatly, the seaweed didn't tear or give way, lol!


I made these specially for my younger child who loves canned tuna and sushi. I wouldn't say these mini kimbap are to die for since there is only one main ingredient. Both of us prefer the sesame oil flavour rice even though it didn't taste as soft as sushi rice. No matter how simple it is, nothing beats home cooked meals, I really enjoyed our once a week,  just the two of us, weekday lunch together. Hmmm...will have to start thinking what to prepare for our next lunch date ;)


Simple Tuna Mayo Kimbap

Ingredient:
(serves 2)

2 cups uncooked Short grain rice (cup here refers to the standard measuring cup provided by rice cooker)
2 teaspoons sesame oil (adjust according to taste)
1/2 teaspoon salt (adjust according to taste)

1 can tuna chunks
1 tablespoon mayonnaise (I use Japanese mayonnaise, Kewpie brand)
some freshly cracked black pepper
some dried parsley flakes (optional)

4 sheets roasted seaweed


Method:

Cook 2 cups rice with 2 cups water in rice cooker. When the rice is cooked, leave in rice cooker for 15mins. Remove cooked rice from rice cooker. While the rice is still hot, add sesame oil and salt, mix with rice paddle, add more sesame oil or salt if desired. Leave aside to cool (about 5 to 10mins) while preparing the tuna filling.

Drain the water/oil from the canned tuna. Mix in mayonnaise, black pepper and dried parsley flakes (if using). Set aside.

Place a sheet of roasted seaweed with the shiny side down on a sushi bamboo mat. Divide rice into 4 portions. Spread 1 portion of the rice (should still be a little warm, not completely cold or hot) evenly onto the seaweed, leaving about 1/2 inch of open strip on bottom and about 2 inches on top (the rice should cover about 2/3 of the seaweed). Place tuna mixture,  length wise, on the rice, roll up from the bottom. Repeat with the remaining rice.

Wet a sharp knife with water or rub with some sesame oil. Cut each roll into 6 pieces (wet the knife after each cut to prevent sticking). Arrange cut rolls on plate, if the rolls are not served immediately, cover with cling wrap.


Thursday, 14 February 2013

Orange Chiffon Cake in cups

Happy Lunar New Year to everyone!

Pardon my tardiness in updating my blog and thousand apologies especially to those who still hop over to this tiny blogosphere once in a while.

I do bake regularly but I am always going back to my favourite recipes such as pandan chiffon, the usual bread loaves and buns, simple muffins and cookies. Nothing inspiring or worth mentioning...


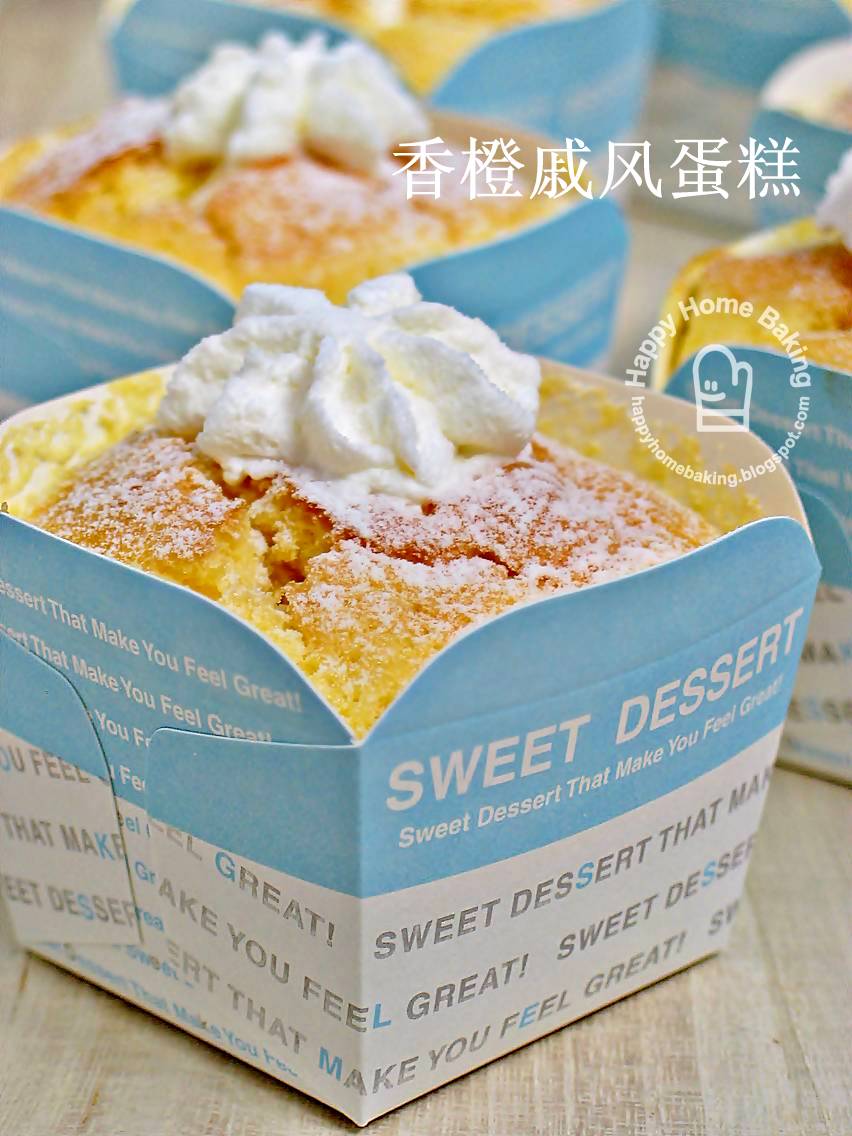
except for this latest Orange Chiffon cake which I baked in paper cups instead of the usual tube pan. I have meant to give the cake away, and what better way to present the cake using these lovely muffin cups :)


I piped whipping cream into each cup cakes. just so to start using the carton of non-dairy whipping cream I bought a month ago. The end result looks quite similar to the popular Hokkaido chiffon cake though.


The chiffon cake texture was soft and light although they were baked in paper cups. While baking in the oven, they rose beautifully over the rim, almost on the verge of overflowing. Most of them cracked...but I have no issues with cracked chiffon cakes, in fact I love the cracks ;)

Once out of the oven, they started to shrink, I didn't invert the cakes (or should I??) and left them to cool right side up. Very soon, the cakes deflated to just the right height...not falling short of the base of the four flaps on each square cup. It was my first attempt at piping cream into a cup cake. I have no idea how to go about it but to rely on my gut feel. I simply forced the piping tip into the centre of the cake and squeeze in as much cream I could, I stopped piping when the cream started flowing out from the side of the piping tip. I used the remaining cream to pipe rosettes on the tops, so as to cover the holes. I kept my fingers crossed that I was doing the right thing...that I got enough whipping cream into the cake. Fortunately, these little cuppies were meant for family, I have no qualms about giving away half-filled cakes to family members, actually I didn't even taste one before I gave them away, something I wouldn't do if they were meant for friends ;) 


It turn out that I got the piping right as the cuppies were filled with quite a substantial amount of cream, although I think the cakes could take in more. The taste, at least the whipping cream, was rather close to those store bought Hokkaido cake which I have tried. I received positive comments such as...'they taste better than store bought ones'. Credit must go to the orange chiffon cake recipe which I have taken from my favourite chiffon cake book, 好吃戚风蛋糕轻松上手. The cake was delicious and full of flavors as they were made with orange juice, orange zest and Cointreau (an orange-flavoured liqueur)...another baking ingredients which I have just used even though I bought it more than a year ago. 

With this little experience I have gained, I expect myself to bake some real Hokkiado chiffon cupcakes soon...


Orange Chiffon Cake in cups

Ingredients:
(makes about 15 cupcakes)

5 egg yolks
40g caster sugar
55ml vegetable oil
95ml orange juice (from about two oranges)
2 teaspoons Cointreau
zest from 1 orange
130g cake flour

7 egg whites
70g caster sugar

for frosting:
about 240ml (1 cup) non-dairy whipping cream for piping
1 teaspoon Cointreau
some icing sugar for dusting

Method:
  1. Place egg yolks in a mixing bowl. With a manual hand whisk, whisk the yolks a little. Add in sugar and whisk to combine. Add in vegetable oil gradually, whisk to combine. Add orange juice, cointreau and orange zest, whisk to combine. Sieve over the flour and whisk till the flour is fully incorporated. Do not over mix. Set aside.
  2. In a clean, dry mixing bowl, beat egg whites with a handheld electric mixer on low speed until mixture becomes frothy and foamy. Add half of the sugar amount and turn to high speed and beat the mixture. Continue to add in the remaining sugar and beat until the egg whites reaches the soft peak stage.The soft peak stage is reached when the peaks of the whites curl over and droop slightly. The egg whites should appear smooth and glossy. (Do not over beat the whites still stiff, it is better to beat the whites still soft peaks for easy folding with the yolk batter.)
  3. Add the beaten egg whites into the egg yolk batter in 3 separate additions, each time folding gently with a spatula until just blended.
  4. Pour batter into paper cups till it reaches just before the base of the flaps. Place paper cups onto baking tray and bake in pre-heated oven at 180 degC for 12~15 mins, or until a toothpick inserted into the centre comes out clean. Leave to cool completely.
  5. With an electric mixer, beat non dairy whipping cream and cointreau until stiff. Fit piping bag with a piping tip, fill the bag with the whipped cream and pipe the cream into the centre of the cake. Dust with icing sugar and leave to chill in the fridge before serving. 
Recipe source: adapted from 好吃戚风蛋糕轻松上手, 福田淳子