Friday, 10 May 2013

Mango Chiffon Cupcakes

Cupcakes are something that I hardly ever make.


I prefer muffins since most cupcakes recipes calls for a lot more sugar and fat. But with my recent success with baking chiffon cakes in cups, I have adventured into baking a lighter version of cupcakes such as these mango chiffon cupcakes.


With mangoes found in abundance at this time of the year, I have been carting loads of Thai mangoes from the supermarket. I simply couldn't resist putting the fresh, blemishes-free fruits inside my basket each time I spot them at the fruits section ;)

I couldn't find any suitable mango chiffon cake recipe so I tweaked this cranberry yoghurt chiffon recipe as I reckoned that mango puree somewhat has the same consistency of yoghurt?

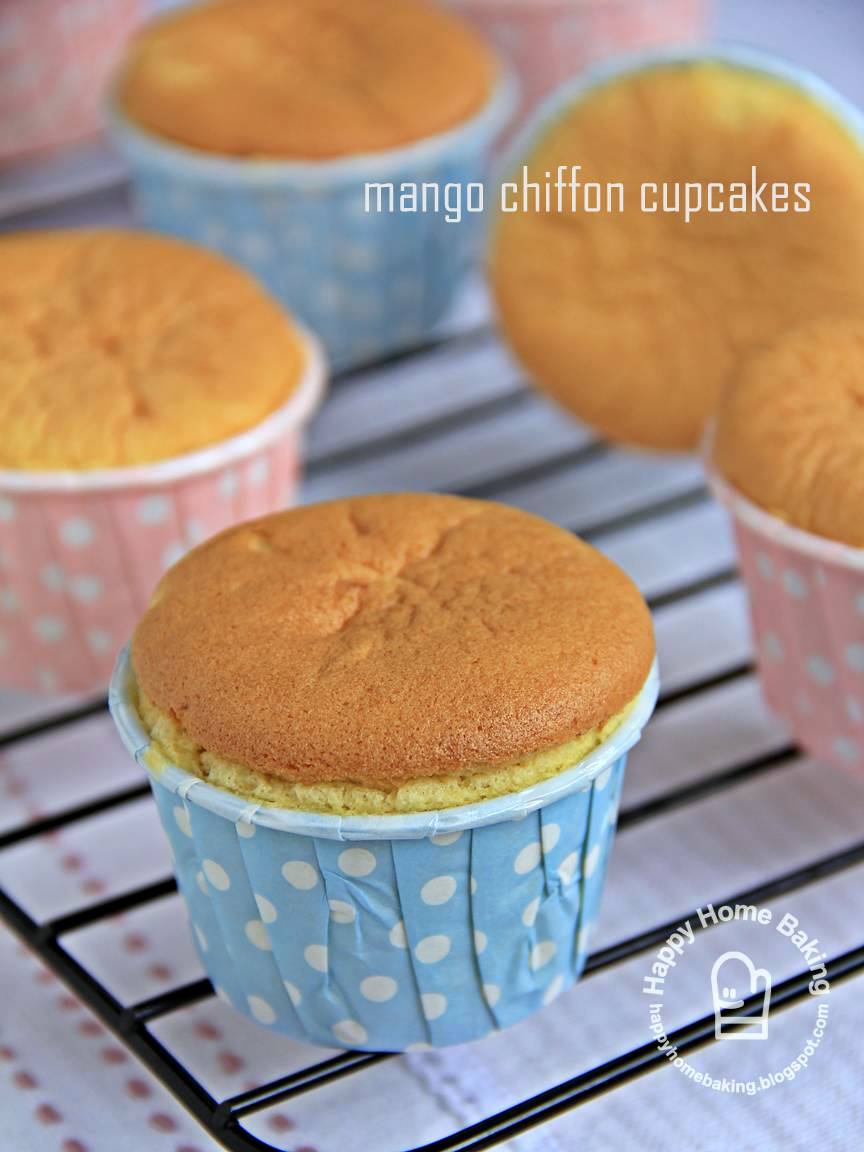
The mango chiffon turned out fabulous! The chiffon sponge rose high and mighty when they were baking in the oven...they were at least an inch above the rim, I'm not kidding! Unlike my previous attempt at baking chiffon cakes in square paper cups, the cake didn't crack all over which made them looked really like huat kuehs(steamed cakes). This time, with my usual round muffin paper cups, the 'high-rised' cakes reminded me of souffles or cakes topped with macaroons!

My younger child went 'woah!' when he first caught sight of the cupcakes in the oven...upon closer scrutiny he went 'oh dear! oh dear!' when the batter appeared to be in danger of overflowing anytime. I told him matter-of-factly, "Don't worry, they will deflate upon cooling." "Why?" he asked. "Hmmm...because when it is hot, it expands, when it is cold, it contracts. The air bubbles inside the cake batter expands during baking, and contracts or pops when cooled. The cake will collapse and sink." I don't know whether my answer is correct but he was happy with it, lol.


With the well baked chiffon cakes, I went on to prepare the filling cum frosting. The filling or frosting on the cupcakes is a mixture of whipping cream, yoghurt and fresh mangoes. It is much lighter than buttercream and taste a lot like ice cream. Well, it has to be since I have followed this mango yoghurt ice cream recipe :)


Just like Hokkaido chiffon cupcakes, I have filled the inside of each cupcake with the mango frosting. Although the texture is a bit denser than chiffon cakes baked in a tube pan, it still taste light and very refreshing...the mango flavour is very prominent even without any artificial flavourings. These cupcakes are certainly less sinful than butter cupcakes...but, that is, as long as you can refrain from eating a few at one go, lol!


I shall end my post with my favourite picture of theses chiffon cupcakes...love the nice wrinkles on top.

I doubt I will ever fall out of love with Baking.

Baking is Amazing...Baking is Fun!

Happy Baking everyone!


Mango Chiffon Cupcakes

Ingredients:
(makes 10 cupcakes)

for the chiffon cupcakes:
3 egg yolks (use large eggs)
25g caster sugar
50ml vegetable oil
100g fresh mangoes (use sweet, well ripened mangoes)
1 teaspoon lemon juice
80g cake flour

4 egg whites (use large eggs)
55g caster sugar


for the filling/frosting:
80g fresh mangoes (use sweet, well ripened mangoes)
25g caster sugar
75g mango flavoured yoghurt (I used peach and mango flavour)
125ml non-dairy whipping cream


Method:

to make the cupcakes:
  • Blend 100g mangoe flesh till smooth. Set aside.
  • Place egg yolks in a mixing bowl. With a manual hand whisk, whisk the yolks a little. Add in sugar and whisk to combine. Add in vegetable oil gradually, whisk to combine. Add the mango puree, lemon juice, whisk to combine. Sieve over the flour and whisk till the flour is fully incorporated. Do not over mix. Set aside.
  • In a clean, dry mixing bowl, beat egg whites with a handheld electric mixer on low speed until mixture becomes frothy and foamy. Add half of the sugar amount and turn to high speed and beat the mixture. Continue to add in the remaining sugar and beat until the egg whites reaches the soft peak stage.The soft peak stage is reached when the peaks of the whites curl over and droop slightly. The egg whites should appear smooth and glossy. (Do not over beat the whites still stiff, it is better to beat the whites still soft peaks for easy folding with the yolk batter.)
  • Add the beaten egg whites into the egg yolk batter in 3 separate additions, each time folding gently with a spatula until just blended.
  • Spoon batter into paper cups till it reaches the rim. Place paper cups onto baking tray and bake in pre-heated oven at 180 degC for 12~15 mins, or until a toothpick inserted into the centre comes out clean. Leave to cool completely. (Note: the cupcakes will rise well above the rim during baking, but will shrink upon cooling.)
to make the filling/frosting:
  • Blend mango flesh, sugar, yoghurt until the mixture becomes smooth. 
  • With an electric mixer, whisk non-dairy whipping cream till stiff. Fold in the whipped cream to the mango mixture. Blend thoroughly.
to assemble:
  • Fit piping bag with a piping tip, fill the bag with the filling. Gently push the piping tip into the centre of each cupcake and fill the inside with the filling. Then pipe the whipped cream on top of the cupcake.
  • Leave to chill in the fridge before serving.
Recipe source: chiffon cupcakes adapted from 好吃戚风蛋糕轻松上手, 福田淳子

Saturday, 4 May 2013

Simple Chocolate Tart

I had wanted to make a banana cream pie using the left over tart crust from making the matcha cheesecake tart. However, I had to reserve my whipping cream for a batch of mango hokkaido cupcakes which I had planned to bake for my baking kaki (kaki refers to friend, buddy).


A quick glance through my ever growing list of to-dos, I settled on this simple chocolate tart recipe taken from my current favourite cookbook...Home Baking 星期天的烘焙时光 (loosely translated as Baking on a Sunday).

This chocolate tart is made simply by pouring chocolate ganache onto a pre-baked tart crust, and then decorated with some chopped pistachios. Since I have made the dough pastry earlier all I had to do was to thaw the frozen dough in the fridge (over night), this saves me one step of making the dough from scratch :)


The original recipe requires dairy whipping cream or heavy cream to make the chocolate ganache. I was very reluctant to get a tub of dairy cream just for this, as I always have problem finishing the leftovers. This caused me to switch on my 'experimental mode'....why not substitute the heavy cream with milk ? I had great success making homemade chocolate fondue with low fat milk (see here)...so I was confident that it would work the same for this chocolate tart.

I did a search online and learned that milk can be used to make chocolate ganache, as long as some butter is added. Bingo! What a coincident that this chocolate filling also requires butter! And, the rest is history...


I shall let the following pictures speak for themselves...


Since I couldn't make a banana cream pie, I had, on purpose, used banana flavoured low fat milk to make the chocolate filling. Even with untrained palate, my younger child was able to detect the strong banana flavour in the chocolate tart. Well, I am not sure whether this is actually a good thing as it means that the milk is loaded with too much artificial flavouring!

Following the instructions in the recipe, I had also added some Kahlua coffee liqueur to the chocolate filling. With an equally untrained palate, I wasn't able to tell whether a tart is spiked with alcohol, lol. The only difference I could detect was, the filling was slightly bitter after I added in the Kahlua...but there wasn't any coffee taste to it. Either the amount of liqueur used is too little or its presence was overshadowed by the chocolate or the banana flavoured milk.

Nevertheless, this simple tart serves as a delightful dessert...something I will certainly make again. Nothing beats a homemade tart crust that perfectly complements the smooth and velvety chocolate filling (with just the right consistency, not too runny and not too firm)...and not forgetting the pistachios...you will never go wrong matching nuts with chocolate!


Chocolate Tart
(makes an 18cm tart)

Ingredients:

for the tart crust:
(Note: the ingredient makes 2 tart crust dough, you may freeze the second dough up to 2 weeks for later use).
150g unsalted butter, cut into small cubes, softened at room temperature
80g caster sugar
1 egg, lightly beaten (about 55g without shell, use room temperature egg)
250g cake flour
60g ground almond (almond powder)

for the filling:
120g dark chocolate, finely chopped (I used bittersweet mini chocolate chips)
30g unsalted butter
85ml fresh milk (I used banana flavoured low fat milk)
2 teaspoons Kahlua coffee liqueur (omit if not available)

some chopped pistachios for decorating

Method:

to make the tart crust:
  • Lightly grease an 18cm tart pan (with removable base) with butter, set aside.
  • Toast almond powder at 100 degC for 10 mins. Stirring in between. Let cool.
  • Beat sugar and butter with a ballon whisk until the mixture turns pale. Add the egg gradually (a tablespoon at a time), mix well after each addition. Add the ground almond and fold with a spatula. Sieve over the flour. Mix with spatula and gather the mixture with hand to form a soft dough.
  • Weigh and divide the dough into 2 egual portion. Flatten the dough to form a round disc. Place each dough into separate ziplock or plastic bags. Leave one of the doughs to chill for about 1 hour. Store the other dough in the freezer compartment for later use for other types of tarts. (Note: Alternatively, you may divide the crust ingredients into half and make only 1 portion).
  • Remove dough from fridge and roll out the dough in between 2 sheets of baking paper (I used two plastic sheets cut-out from clear plastic bags) to about 23cm in diameter. Remove one side of the baking paper/plastic sheet. Gently lift up the other sheet of baking paper/plastic (with the pastry dough still on it) and flip the dough over the prepared tart pan. Remove the baking paper/plastic sheet. (Don't worry if some parts of the dough broke off. It can be moulded easily back into the tart pan.) Mould the dough into the tart pan, smoothing the edges and the rim carefully.
  • Prick the dough surface with a fork (this helps to prevent the pastry from puffing up when baking). Cover and chill the moulded tart crust in the fridge for 20mins (this helps to prevent the pastry from shrinking too much after baking.)
  • Line a sheet of parchment paper over the tart base. Place baking beads/weights on the parchment paper (I used green beans as baking weights), enough to cover the tart base.
  • Bake in pre-heated oven at 180 degC for 20 mins. Remove the baking beads and parchment paper. Put it back into the oven and continue to bake for another 15~20mins until the crust is golden browned. Let cool completely. Leave the crust inside the tart pan, do not unmould.
to make the filling:
  • Place milk and butter in a saucepan, bring to a simmer. Once the butter is melted, turn off the heat. Add in finely chopped chocolate (or chocolate chips) and leave it for about 1 min. Stir until all the chocolate melts and the mixture becomes smooth. Leave to cool. Add in Kahlua, stir to combine.
  • Pour the chocolate mixture into the tart. Chill the tart in the fridge until the chocolate mixture is set. Unmould tart and decorate with chopped pistachios as desired. 
Recipe source: 甜点新手零失败教室 and Home Baking 星期天的烘焙时光

Wednesday, 24 April 2013

not my everyday muffins

These are not your everyday muffins.

They are uji matcha or green tea muffins topped with mini chocolate chips...

made, not by the usual 'muffin method' of mixing the dry with the wet ingredients, but by creaming butter and sugar...

and, there's a little surprise in each of these delicious cuppies...


what's the surprise?! A ball of cream cheese in the middle!


Well, the cream cheese is meant to be in the middle, but mine was too close to the top ;)

I didn't blame myself as I did follow the instruction closely, that is, to fill the muffin cups to half full before adding the cream cheese balls. I believe if I were to fill it to 1/3 full, the cream cheese would be right there in the middle. It also turns out that the cream cheese became tapered and not round like a ball. I think it has to do with my shaping. I am not complaining, since there is a 'heart' in every one of those muffins ;) I have taken the recipe from a cookbook ' Home Baking 星期天的烘焙时光' (loosely translated as: Home Baking on a Sunday). My baking friend suggested that I could try out this recipe after I told her I have some left over cream cheese from the matcha cheesecake tart. I am so glad I heeded her advice!


These aren't my everyday muffins. They're indulgent!

The texture is tender, moist, much softer and lighter than a slice of pound cake. I guess they taste just like cupcakes, minus the frosting. There is also a good balance of flavours...matcha, cream cheese and chocolate...each having its own distintive taste, yet, with not one flavour overpowering any of the others. What can I say? Every bite is a delight!

Oh, before I forget, they taste really good when freshly baked! So, if want to give this a try, do plan ahead, you won't regret enjoying them with your morning or afternoon cup of tea, warm and fresh from the oven :)


I am submitting this post to Aspiring Bakers #30: it's Tea time! (April 2013) hosted by Food Playground.


Matcha Green Tea Cream Cheese Muffins

Ingredients:
(makes 10, muffin cup size: diameter 6cm top, 4.5cm bottom, ht 3.5cm)


150g cream cheese, softened at room temperature
15g icing sugar

85g unsalted butter, softened at room temperature
100g caster sugar
1 large egg, lightly beaten
145g cake flour
5g matcha green tea powder
1 teaspoon baking powder
1g salt (about 1/4 teaspoon)
80g milk
some mini chocolate chips


Method:
  • With a wooden spoon or a spatula, mix cream cheese in a mixing bowl still smooth. Add in icing sugar, mix to combine. Divide the mixture into 10 portions (about 15-16g each). Shape each into round balls. Leave to chill in fridge.
  • Place butter in a mixing bowl, beat with a balloon whisk or an electric mixer till smooth. Add the sugar and continue to beat until the mixture turns pale, light and fluffy.
  • Gradually add in the egg, little by little, whisking after each addition. 
  • Sieve over the flour, matcha powder and baking powder. Fold with a spatula until just combined.
  • Add the salt, stir to combine.
  • Add in the milk gradually and fold with spatula until just combined.  
  • Fill paper muffin cups with batter till about 1/3 full, add the cream cheese balls to each muffin cup. Spoon over the remaining batter till each muffin cup is almost full. Sprinkle top with some mini chocolate chips.
  • Bake in preheated oven at 180degC for about 20-25mins until the top is lightly browned or until a toothpick inserted into the side comes out clean.
Recipe source: adapted from Home Baking 星期天的烘焙时光


Thursday, 18 April 2013

oven grilled mackerel

I am not a good cook.

It is an overstatement to even consider myself a cook. After several years of preparing meals for my family, my culinary knowledge and experience doesn't go beyond the entry-level.

So, naturally, I was elated when I could pull something together which was easy, quick, yet deliciously yummy and best of all with minimal cleaning up and no culinary skills required! (I know, my cooking skills will never improve if I stick to simple dishes forever, lol)


Here's sharing a simple fume free dish with anyone who hates cleaning up an oily kitchen after frying fish. No, I am not talking about using cookwares such as the happycall pans, which I don't own any...but grilling fish with my trustworthy oven ;)


It was really by chance and a real coincident when I saw whole mackerel or saba fish at the wet market. I had actually cooked the same dish the night before, but with frozen saba fillets not the whole fish. The fish wasn't that expensive, at four dollars for one whole fish which worked out to be almost the same price as the frozen fillets I bought earlier.


From lesson learned the night before, I realised mackerel is a very oily fish! The fillets were literally sitting on a tray of oil after they were out from the oven. The skin side was very crispy but not the meat side. For the whole fish, I did a little improvisation. I first lined my roasting pan with foil, to help in easy cleaning, before placing the rack inside the pan. I then cut a sheet of baking paper, that fits just nicely over the rack. The baking paper prevents the fish from sticking onto the rack and I won't have the tough job of scrubbing the rack later (you could use foil too, but I try not to have my food come into direct contact with aluminum foil). To allow the oil to drip down the rack, so that the fish would not be swimming in its own oil, I cut random small holes on the baking paper. All you need to do is to hold the paper a few times, and snip off small corners on the folds.

With my limited knowledge, I have always thought that cutting slits on fish helps it to cook faster, gets it cooked through and also for it to be well marinated. But for grilling saba fish, I learned that the slits also help prevent the skin from 'bursting' or 'shrinking' as it cooks in the oven. So this is a step that one shouldn't over look.

The mackerels were only lightly seasoned with salt and pepper, nothing else. I set the oven to the grill or is it broil(?) function...that is, top heat with fan mode. The fishes are cooked on high heat so that the skin is crispy but the inside is cooked through but moist and juicy. Never over cook saba as it tends to turn dry rather quickly.


Gorgeous grilled mackerels from my oven! I would probably end up with a plate of torn and tattered fishes if I were to pan fry them in the wok ;)


I was pleasantly surprised at how moist and juicy the mackerels had turned out. It reminds me of the grilled mackerels we had in Seoul.  My kids and I had a great time enjoying our long dinner...we cleaned up the mackerels from head to tail...even my younger child enjoyed eating the fish head and found it amusing feeding his brother with the fish eye...his way of showing his affections towards his brother ;) The only downside was, mackerels have got lots of fish bones! I had to keep reminding them to be careful and not to talk when eating the fish. You bet, this dish is going to be a regular on our dinning table. Never mind that my cooking skills hardly improves, such simple and easy meal is the way to go, for me.


Oven Grilled Mackerel

Ingredients:

whole mackerels
salt (I use sea salt)
grounded black pepper
some olive oil
lemon or lime wedges


Preparation:

  • Clean and rinse the fish and pat dry with kitchen paper towels. Cut several slits on both sides (do not cut through). Rub some salt inside the fish and on the skin. Set aside for about 30 minutes. The salt will draw out some of the fishy taste.
  • Set oven to Grill or Broil function and preheat to 200 degC.
  • Rinse the fishes again. Pat dry thoroughly with paper towels.  
  • Lightly rub skin with a little olive oil (just to prevent sticking). Lightly sprinkle some salt and freshly grounded black pepper on both sides. 
  • Set the fish on a baking tray lined with foil (lightly oil the foil), or on the rack of a roasting pan (line the pan with foil and brush the rack with oil, or line the rack with parchment paper as described above).
  • Cook fish (place it at a higher rack position, nearer to the top heat) in preheated oven for 10~12 mins, turning once in between. Do not overcook. Transfer fish to a serving plate and serve immediately with lemon or lime wedges. 


Friday, 12 April 2013

Matcha Cheesecake Tart

It has been a while since I last updated my blog. I can't think of a valid excuse except that I keep procrastinating...before I knew it, another week has flown by.

I have several posts lining up...and I will kick start with this matcha green tea cheesecake tart.


I can't remember exactly when my baking friend gave me a pack of expensive looking Uji matcha powder. Probably we have been meeting up so often, and also she has been showering me with gifts and baking ingredients, and buying me lunch one after another, to the extend that I have problem keeping track! It is a happy problem and I hope you are now green with envy, no pun intended (^^)!


I confessed to my baking friend as I was feeling very guilty that the green tea powder is going to expire soon. She came back with a very good tip, that is, to store the matcha powder in the freezer, it helps to keep it longer. Of course, the very first thing I did after hearing such good advice was to pop the whole pack into the freezer. But, it didn't stay there in the cold for too long ;)

Age is really catching up, I can't recall how I stumbled upon this green tea cheesecake tart recipe here. I was sold after going through the list of ingredients. I have all the items on hand! No special trip to the baking supply store is required. Best of all, according to the site, the recipe is shared by Chef Tomoko Higashiguchi of Patisserie Glace. I have not been to this cafe, but I believe it will be something really delicious.

I didn't follow the recipe to the T though. Instead, I made the tart crust using another recipe from a cookbook. Comparing the two, they are almost identical, except that there is ground almond for the recipe from the cookbook. I have been making tart crust with ground almond and I do think the presence of ground almond does make a difference to the taste.

As for the cream cheese filling, all went well until the last step when the matcha powder is added. According to the recipe, I am suppose to stir in the matcha powder and create a marbling effect. However, I had problem blending the matcha powder to the mixture. I couldn't create any marbling effect after lots of stirring and mixing. Despite the amount of stirring, the matcha powder still didn't dissolve completely! See the speckles of green tea all over?!


My piping skill sucks, and I knew I wouldn't be able to create that beautiful floral motif as shown in the picture from the site. I knew the effect wouldn't be great, so I didn't put in my best effort and didn't do it wholeheartedly. This is the best I could manage and from a distant, it didn't look too ugly ;)


I don't know whether I have added a tad too much lemon juice than necessary, but the very first bite into the green tea cheesecake filling didn't leave me with a good impression. The filling is a little too tangy. However, subsequently, I found myself getting used to the slight tang and the taste got better and better. It was a very refreshing treat with a nice matcha flavour without being overpowering.

Is it really worth the effort to put this together? I'll have to say yes, especially when my family members love it!


I am submitting this post to Aspiring Bakers #30: it's Tea time! (April 2013) hosted by Food Playground.


Matcha Cheesecake Tart
(makes an 18cm tart)

Ingredients:

for the tart crust:
(Note: the ingredient makes 2 tart crust dough, you may freeze the second dough up to 2 weeks for later use).
150g unsalted butter, cut into small cubes, softened at room temperature
80g caster sugar
1 egg, lightly beaten (about 55g without shell, use room temperature egg)
250g cake flour
60g ground almond (almond powder)


for the filling:
1 teaspoon gelatine powder
15ml water
100g cream cheese, leave to soften at room temperature
40g caster sugar
40g plain yogurt
2 teaspoon lemon juice
200g whipping cream (I used non dairy whipping cream)
2 teaspoons matcha/green tea powder

Method:

to make the tart crust:
  • Lightly grease an 18cm tart pan (with removable base) with butter, set aside. 
  • Toast almond powder at 100 degC for 10 mins. Stirring in between. Let cool.
  • Beat sugar and butter with a ballon whisk until the mixture turns pale. Add the egg gradually (a tablespoon at a time), mix well after each addition. Add the ground almond and fold with a spatula. Sieve over the flour. Mix with spatula and gather the mixture with hand to form a soft dough.
  • Weigh and divide the dough into 2 egual portion. Flatten the dough to form a round disc. Place each dough into separate ziplock or plastic bags. Leave one of the doughs to chill for about 1 hour. Store the other dough in the freezer compartment for later use for other types of tarts. (Note: Alternatively, you may divide the crust ingredients into half and make only 1 portion).
  • Remove dough from fridge and roll out the dough in between 2 sheets of baking paper (I used two plastic sheets cut-out from clear plastic bags) to about 23cm in diameter. Remove one side of the baking paper/plastic sheet. Gently lift up the other sheet of baking paper/plastic (with the pastry dough still on it) and flip the dough over the prepared tart pan. Remove the baking paper/plastic sheet. (Don't worry if some parts of the dough broke off. It can be moulded easily back into the tart pan.) Mould the dough into the tart pan, smoothing the edges and the rim carefully. 
  • Prick the dough surface with a fork (this helps to prevent the pastry from puffing up when baking). Cover and chill the moulded tart crust in the fridge for 20mins (this helps to prevent the pastry from shrinking too much after baking.) 
  • Line a sheet of parchment paper over the tart base. Place baking beads/weights on the parchment paper (I used green beans as baking weights), enough to cover the tart base. 
  • Bake in pre-heated oven at 180 degC for 20 mins. Remove the baking beads and parchment paper. Put it back into the oven and continue to bake for another 15~20mins until the crust is golden browned. Let cool completely. Leave the crust inside the tart pan, do not unmould.
to make the filling:
  • Dissolve the gelatine in water and set aside for 10min. 
  • Combine the sugar and yogurt in a pot over medium heat to dissolve the sugar. Stir in the gelatine solution until it’s dissolved. Remove from heat.
  • With a balloon whisk, whisk cream cheese until smooth. Gradually add in the yoghurt-gelatin solution and mix to combine. Add in the lemon juice, mix to combine.
  • With an electric whisk, whisk the non-dairy whipping cream until soft peaks form. With a spatula, fold in 1/3 of the whipping cream to the cream cheese mixture. Fold in the remaining whipping cream to the cream cheese mixture.
  • Add in the matcha powder and mix until blended. 
  • Pour the mixture into the tart pan until it is full. Pour the remaining mixture into a piping bag and pipe a floral motif on the cake.
  • Chill the tart for at least 2 hours until it is firm. Unmould before serving.
Recipe source: 甜点新手零失败教室 and here.