Friday 29 June 2012

cake for a special occasion

I don't usually make layered cakes unless there is a special occasion.


I baked this simple chocolate layered cake for my child's birthday, and also to mark the 14th year since I became a mom ;) How time flies, our bundle of joy has now grown into a healthy teenager!


As what I have planned, we bought him a camera as birthday present. He was uneasy when I asked him which model he would prefer, he felt that he didn't deserve it at all. It is an expensive gift but I know he will make good use of it. Since he didn't want any birthday presents for the past few years, plus I do not reward him with gifts even for doing well in his studies, I thought this camera is a good way to make up for everything. To make him feel more comfortable,  I told him not to expect any birthday presents for the next ten years, this 'assurance' instantly puts him at ease ;)


Back to the layered cake. I got out of my comfort zone this time. Instead of using the whole eggs method to make a genoise sponge cake, I followed a chocolate chiffon cake recipe. This recipe came in handy as it calls for baking powder and baking soda, which was good for me as I needed that little extra help to make sure the cake would rise since I wanted to bake it in a normal cake tin instead of a chiffon tube pan. The cake did rise and formed a slight dome with a small crack on it. It didn't bother me much since I could removed the dome easily. After slicing the cake into three layers, I couldn't help but to take a picture of it. The cake looked lovely without any frosting, I know I am quite capable of messing up things when it comes to frosting and decorating a cake, it is not difficult to imagine how ugly it will end up.


The chocolate ganache was surprisingly easy to work with, much easier to smooth it evenly over the cake than whipping cream. Even without using a cake turntable the chocolate layer appeared to be quite smooth. Not too bad for a self taught baker.


As usual I was at a loss when it comes to decorating a cake. I lack creativity and imagination. Fortunately, my younger son was at home that afternoon. With his help, we managed to put something together...although it turned out to be a little too kiddish for a teenager, lol.  But, we know the birthday boy wouldn't mind...unlike his mom, he doesn't eat with his eyes.


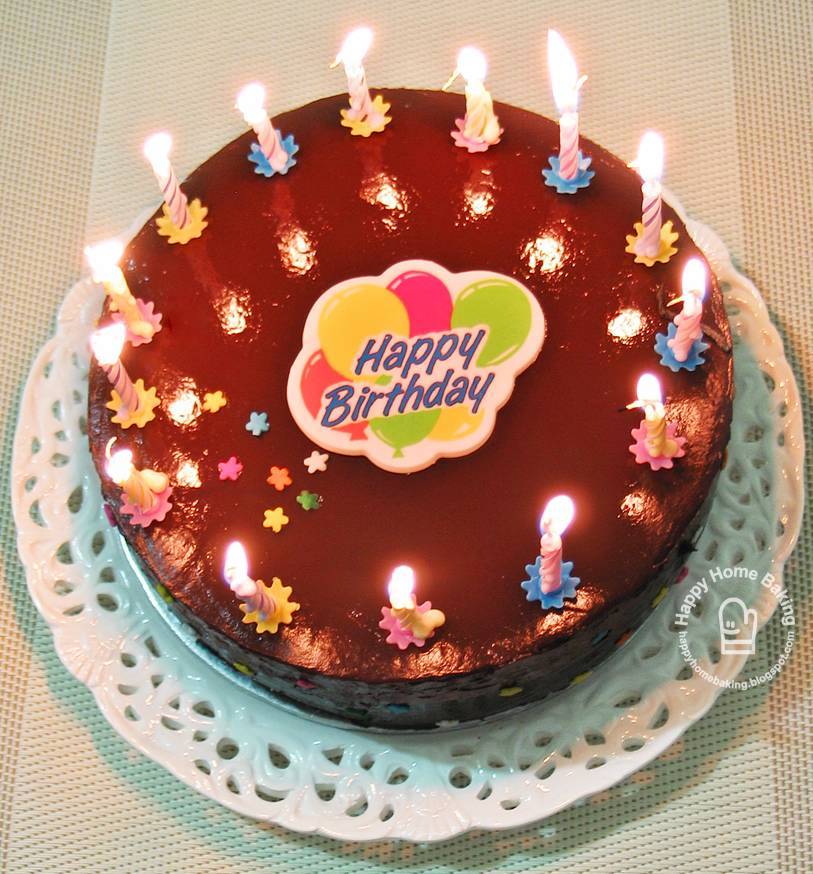
We had a mini celebration that evening. The lovely reflections of the candle flames on the chocolate layer made this homemade cake looked so much more sophisticated. Actually, I totally forgot about getting a box of matchsticks to light the candles. Since the candles were very small, I didn't want to risk burning my fingers to light them directly over my gas stove. I have no matchsticks at home but I do have a packet of spaghetti. Yes, I used a piece of spaghetti as a lighter. It worked really well and I only used one piece to get the job done. If I were to use matchsticks, I would probably used up a whole box to light so many candles. Besides using it as a matchstick, do you know that spaghetti can also be used as cake tester? The only down side is, if you are not careful, it may break and you may end up with a broken piece of spaghetti inside your cake!


The texture of this cake was slightly heavier than a normal chiffon cake, it tasted just like the usual sponge cake to me. Nevertheless, I was quite satisfied with the result as it could get very tricky when making chiffon or sponge cake with cocoa powder. The chocolate ganache was really good, I used only a very small amount, yet, its presence was felt. Overall it was a delicious cake that everyone enjoyed.


Chocolate Layered Cake

Ingredients:
(make one 7" round cake)

for sponge layer:
3 egg yolks (use large eggs)
25g caster sugar
50ml vegetable oil
70ml water
1 teaspoon vanilla extract
85g cake flour
25g cocoa powder
1 1/2 teaspoons baking powder
1/3 teaspoon baking soda

4 egg whites (use large eggs)
55g caster sugar

for chocolate ganache:
170g pouring cream (I used one can Nestle pouring cream)
170g dark chocolate, coarsely chopped

Method:

   to make sponge cake:
  • Line base of a 7" round pan with parchment paper. Do not line or grease the sides.
  • Sieve together cake flour, cocoa powder, baking powder and baking soda. Set aside.
  • Place egg yolks in a mixing bowl. With a ballon whisk, whisk the yolks a little. Add in sugar and whisk till the mixture turns pale and thickens.
  • Add in vegetable oil gradually, whisking at the same time till the mixture combines.
  • Add in water gradually, whisking at the same time till the mixture combines. Add in vanilla extract, whisk to combine. Sieve over the flour mixture and whisk till the flour is fully incorporated. Do not over mix. Set aside.
  • In a clean, dry mixing bowl, beat egg whites with a handheld electric mixer on low speed until mixture becomes frothy and foamy. Add half of the sugar amount and turn to high speed and beat the mixture. Continue to add in the remaining sugar and beat until the egg whites reaches the soft peak stage.The soft peak stage is reached when the peaks of the whites curl over and droop slightly. The egg whites should appear smooth and glossy. (Do not over beat the whites still stiff, it is better to beat the whites still soft peaks for easy folding with the yolk batter.)
  • Add the beaten egg whites into the egg yolk batter in 3 separate additions, each time folding gently with a spatula until just blended.
  • Pour batter into the prepared pan. Tap the pan lightly on a table top to get rid of any trapped air bubbles in the batter. 
  • Bake in pre-heated oven at 170 degC for 40~45 mins, or until a toothpick inserted into the centre comes out clean, when lightly pressed the cake will spring back. Invert the pan immediately and let cool completely before unmould. To release the cake from the pan, run a thin-bladed knife or a off-set spatula around the inside of the pan.
   to make chocolate ganache:
  • Place cream and chopped chocolates in a bowl. Set it over a saucepan of simmering water (make sure the bowl is big enough to sit over the saucepan).
  • Stir the mixture gently with a spoon till the chocolate melts and mixture becomes smooth.
  • Remove from the bowl from the saucepan. Use immediately.
   to assemble:
  • Slice the cake horizontally into three layers. Place a layer of sponge cake on a cake board. Spoon about 4 heaped spoons of the chocolate ganache onto the surface. Spread evenly with a spatula. Repeat with the second layer of sponge cake. Place the third layer and spoon the remaining ganache over the top and spread it over to the sides. Smooth the surface evenly with the spatula. Decorate as desired. Keep chilled in fridge.
Recipe source: adapted from 初事身手做甜点, 信太康代

Tuesday 26 June 2012

nothing special

There is nothing special about this simple banana walnut cinnamon cake. This cake is as ordinary as your everyday white loaf bread. I can't find anything that I could shout out loud. There is absolutely no wow factor, be it the texture, the flavour...and it certainly doesn't look like a pretty cake. In fact, the method of preparing this cake is not very different from baking a batch of muffins. It is just like putting 12 muffins together to form a cake.


Yet, I couldn't help but to blog about it, and that is despite the colour of my photos came out weird, thanks to the poor lighting condition.


and here are my reasons for writing up this post:

This is the kind of cake that I will make anytime, as long as I have a bunch of over ripe bananas and leftover walnuts, or any nuts or dried fruits I could find in my fridge. Making the cake is a breeze, you do not have to invest much of your precious time just to put a cake into the oven. It is one of those cakes that you could bake on a whim...jumping from the couch to the kitchen ;) There is not much washing up either. Best of all, it is quite a fool-proof recipe...I doubt anything could go wrong, unless this is the very very first time you have ever baked a batch of muffins. Even then, by following the steps closely, I am sure any novice will be able to make a stir-and-bake cake like this one.

Despite its simplicity, the texture of the cake is really good....soft, moist and fluffy. Definitely a healthier choice than any store bought banana walnut cake as it doesn't leave a greasy after taste, or stick to the roof of your mouth...yet it doesn't taste dry at all. I wouldn't recommend omitting the cinnamon powder as it does lend a aromatic flavour to this ordinary, everyday tea cake.

On a side note, I can't remember where I read it, but I have learned something new about preparing a cake pan for baking. I have always line the base of the cake pan with parchment paper, but for the sides, sometimes I will line it with parchment paper, and sometimes (especially if the recipe specifically states so) I will grease, with butter, and flour the sides. It never occurs to me whether it makes any difference...since both methods help to prevent the cake from sticking to the pan. The only difference for me is, I always get very frustrated trying to line the sides or a round pan with parchment paper. I have this thing about making sure the paper sticks perfectly to the sides so that my cake will come out of the pan with a perfect 90 degree straight edges! Anyway, it may not be new to you, and it may even sound trivial, I learned that by greasing and flouring the sides, the finished cake will give a nice golden crust. Call me a perfectionist if you must, but I was really happy to notice the evenly browned crust all over the sides of this cake. In case you are wondering, no, the crust is not thick and hard at all, just a nice thin layer, which doesn't add much value to the cake, but does brighten up an ordinary home baker's day....

Thank you for reading :)


Banana Walnut Cinnamon Cake

Ingredients
(makes one 7" cake)

150g cake flour
2g ground cinnamon
4g baking powder
2g baking soda
1g salt (I used sea salt)
2 large eggs
80g caster sugar (I cut down to 70g)
70ml vegetable oil (I used canola oil)
1 1/2 teaspoons pure vanilla extract
250g, about 3 medium sized over ripe banana, mashed (original recipe uses 120g)
70g walnuts, coarsely chopped (reserve 1 tablespoon as toppings)


Method:
  • Toast chopped walnuts at 150degC for about 8 to 10mins, stir in between and make sure walnuts do not get burnt.
  • Line base of a 7" round pan with removable base with parchment paper, grease (with butter) and flour the sides. Set aside.
  • Sieve together cake flour, ground cinnamon, baking powder, baking soda and salt, set aside.
  • Place eggs, caster sugar, oil and vanilla extract in a mixing bowl. With a manual whisk, whisk to combine.
  • Add mashed banana, whisk to combine.
  • Sieve over the flour mixture, with a spatula, fold the mixture until just incorporated. Do not over mix. The batter should appear lumpy.
  • Add in chopped walnuts (set aside 1 tablespoon to use as toppings), stir just to combine.
  • Pour batter into prepared pan. Tap the pan a few times on work surface to release any trapped air bubbles. Sprinkle the top with the remaining walnuts.
  • Bake in pre-heated oven at 175degC for 30-35mins or until a tooth pick inserted into the centre comes out clean.
  • Remove from oven, leave to cool for 5mins. Unmould and transfer to wire rack, let cool completely.
Recipe source: adapted from 我的幸福手作面包,李成实

Thursday 14 June 2012

simplicity

A good recipe is hard to come by.


One that uses the most basic ingredients and doesn't requires lots of sugar and fat in order to yield moist tender crumbs is even harder to find.


I am lucky to come across this simple Chocolate Cake recipe from a bread making book.


Although it looks very much like a pound cake, it is actually a sponge cake. The batter is prepared by beating eggs and sugar, whereas a pound cake is made by creaming butter and sugar. The original recipe calls for dairy cream but I took the liberty to replace it with plain, natural yoghurt. I am quite certain that the result is not too far off from the original intention. Even though I could have deflated the batter a little, the cake rose nicely and even form a pretty crack on its own, that is, without having to 'slit' the batter, a step which is quite essential if you are baking a pound cake.


The texture of the cake is slightly on the dense side, but still taste moist and tender...a cross between a sponge cake and a pound cake. What I like most is the simple chocolaty taste.  This recipe is a keeper.


Chocolate Sponge Cake

Ingredients
(makes one small 18cmx9cmx7cm loaf cake )

80g cake flour
20g cocoa powder (I used Valrhona cocoa powder)
3g baking powder
1g baking soda
1g salt
2 large eggs, room temperature
90g caster sugar (I used golden caster sugar)
50ml vegetable oil (I used canola oil)
50g natural plain yoghurt, room temperature
1 1/2 teaspoon vanilla extract

Method
  • Line a 18cmx9cmx7cm loaf pan with parchment paper. Set aside
  • Sift cake flour, cocoa powder, baking powder, baking soda and salt, at least 3 times. Set aside.
  • Whisk eggs and sugar in a mixing bowl with an electric mixer on high speed until the batter triple in volume, thickens and leaves a ribbon-like trail when the paddle is lifted up. Takes about 5 mins. Turn to low speed, whisk for another 1 min (this is to stablise the air bubbles in the batter).
  • Sift over the flour mixture into the batter in 3 separate additions. With each addition, use a spatula, gently Fold in the flour until well blended. Take care not to deflate the batter.
  • Remove some batter into another mixing bowl. Add in oil, yoghurt and vanilla extra. Mix with spatula until well blended. Add this mixture to the egg and sugar batter. Fold gently with spatula until well blended.
  • Pour finished batter to the prepared loaf pan. Tap the pan on work surface a few times to release any trapped air bubbles in the batter. Bake in preheated oven at 170degC for 25~30mins or until a skewer inserted in the centre comes out fairly clean (do not over bake). Unmold and transfer to wire rack to cool completely.
Recipe source: adapted from 我的幸福手作面包,李成实

Wednesday 6 June 2012

I don't get tired of muffins...

and I do find inspiration in them...

Whenever I miss the simple act of mixing flour, eggs, sugar and butter in a mixing bowl, the image of a tray of freshly baked muffins would jump out from behind the back of my mind. There is always a muffin recipe waiting for me to explore; and I have never seems to be short of any of the basic ingredients that is called for...be it flour, eggs, milk, sugar and vegetable oil. There is always a bag of left over chocolate chips, some left over dried fruits, walnuts, hidden somewhere in my fridge (^_^").

Oh yes, not forgetting the fact that I have one drawer full of paper muffin cups!


It took me just slightly over half an hour from reading the recipe to popping these muffins into the oven. I have adapted a cinnamon and nuts muffins recipe to turn it into a batch of Cinnamon, Walnuts and Chocolate Chips Muffins.  Before I was done washing up the mixing bowls, I could already smell cinnamon :)


Warm, freshly baked, homemade muffins are not only a nice treat for breakfast but also great for a casual tea time at home. These muffins are full flavour, certainly not a surprise as they are studded with all the walnuts, chocolate chips and cinnamon. The texture is a teeny weeny on the dry side...maybe they are made with milk only...I guess I am so used to the very moist muffins made with yoghurt.


I am so inspired by these lovely muffins that I think I have done a decent job in the composition of the above images. Of course, I must thank my cyberfriend VB for sending me the pretty muffin liners, gorgeous kitchen towels and the matching mug! I could almost imagine myself sitting inside a lovely little cafe at a little town in Provence, drinking tea and savouring muffins... ahem...delicate French desserts ;)


Cinnamon Walnuts and Chocolate Chips Muffins

Ingredients
(makes 9 regular size muffins)

140ml milk
80ml canola or corn oil
1 large egg, lightly beaten
1 teaspoon pure vanilla extract
200g plain flour
1 teaspoon baking powder
1 teaspoon ground cinnamon
100g granulated sugar
1/8 teaspoon salt
50g walnuts, coarsely chopped
50g mini semi-sweet chocolate chips

Method:
  1. In a mixing bowl, whisk together milk, oil, egg and vanilla extract, until just combined.
  2. Sieve flour, baking powder and ground cinnamon into another mixing bowl. Add sugar, salt and stir to combine.
  3. Pour the wet ingredients into the dry ingredients. With a rubber spatula, fold the wet ingredients into the dry ingredients and stir only until the ingredients are just combined (Note: stop stirring once the flour incorporates into the batter, but do check that there is no pockets of flour at the bottom of the bowl). 
  4. Reserve 1 tablespoon each of the chopped walnuts and chocolate chips. Gently stir in the rest of the chopped walnuts and chocolate chips into the batter. Do Not over mix the batter. The finished batter should appear thick and lumpy.
  5. Spoon batter into paper muffin cups, fill it to about 3/4 full.
  6. Sprinkle top with the reserved chopped walnuts and chocolate chips. 
  7. Bake in preheated oven at 200degC for about 20 - 25mins or until a toothpick inserted in the center of a muffin comes out clean. Transfer to a wire rack and let cool completely.
Recipe source: adapted from 我的幸福手作面包,李成实